Welcome to our comprehensive guide on Google Merchant Center. In this article, we'll take you through the ins and outs of Google Merchant Center and its significance for e-commerce businesses. This guide is tailored specifically for independent retailers and e-commerce operators embarking on their journey with Product Listing Ads.
Introduction to Google Merchant Center
Google Merchant Center holds a pivotal role in the success of e-commerce businesses, offering many benefits that can transform your online presence.
Here are some key advantages to using Google Merchant Center:
- Gateway to Google Shopping: It serves as a gateway to advertising your products with Google Shopping and integrates seamlessly with Google Ads.
- Product Information Hub: Google Merchant Center allows you to store essential product information needed to generate and serve your product ads to potential customers effectively.
- Accuracy Matters: It ensures that your product data is accurate when presented to buyers searching on Google for products.
- Customisation: One of the critical advantages of the Google Merchant Center is that you can customise the product feed, and therefore your product listing content, in many different ways to suit your business needs.
- Analytics Support: Google Merchant Center offers robust analytics support for tracking traffic and sales originating from Merchant Center, providing valuable insights into the performance of your product listings.
What Is Merchant Center
Google Merchant Center, often called GMC, is a digital platform that plays a pivotal role in creating Shopping ads for Google, YouTube, and various Google partner sites.
Here's how Google Merchant Center works:
- Product Information Repository: It is a central repository for e-commerce businesses to upload and maintain product information comprising titles, descriptions, images, pricing, and more. This information is displayed in Google Shopping search results when customers search for their products.
- Integration with Google Services: Google Merchant Center seamlessly integrates with various Google services. You must add your products to your Merchant Center account to appear across Google websites and apps like Search, Maps, YouTube, and more when customers search for your products.
- Platform Compatibility: If you're using an e-commerce platform like Shopify or WooCommerce, you can easily connect your shop to your Google Merchant Center account to automatically add your products and synchronise product data.
- Manual Upload: Alternatively, you can upload product information using a spreadsheet or add items individually.
- Directing Customers: When someone clicks on your product listings, Google leads them to your website's product page. You can even guide customers to your store if you have a physical shop.
What Is Google Merchant Center Next
Now that we've introduced you to the fundamentals of Google Merchant Center, it's essential to touch on the concept of "Merchant Center Next." While we'll provide a brief overview here, we've covered this topic in more depth in a previous post titled "Demystifying Merchant Center Next: A Guide To The Future of Product Listing Ads." You can read the full article at What Is Merchant Center Next.
Merchant Center Next represents the future of Product Listing Ads (PLAs) and brings exciting advancements to e-commerce advertising. One of the main features is that it offers a simplified version of the Classic Merchant Center, which we cover in this post. However, some features are still absent from the new version, and not all retailers have access.
Our dedicated guide delves deep into the implications and possibilities this evolution brings to online retailers. So, if you're eager to explore the cutting-edge features and strategies associated with Merchant Center Next, check out our comprehensive article.
Google Merchant Center Free Listings
In the world of e-commerce, every opportunity to get your products in front of potential customers matters. That's why understanding the concept of free product listings in Google Merchant Center can be a game-changer for your online retail business.
What Are Google Merchant Center Free Listings?
First and foremost, it's important to emphasise that using Google Merchant Center is completely free. With a Merchant Center account, you can effortlessly add your product offerings to Google's expansive ecosystem without incurring costs.
These free listings can make a significant difference in your online visibility. They enable your product listings to appear when customers actively search for products similar to what you offer on various Google platforms, including Google Search, Maps, YouTube, and more.
Merchant Center Powers Product Listing Ads (Google Shopping Ads)
While the Google Merchant Center is the gateway to these free product listings, its primary purpose for many businesses is to power Product Listing Ads (PLAs), also known as Google Shopping Ads—a paid product advertisement.
You will be billed via your Google Ads account if you decide to run Google Shopping Ads. These paid ads offer several advantages:
- Prominent Placement: Paid Shopping Ads often appear more prominently in search results, increasing the visibility of your products.
- Expanded Reach: Paid ads have the potential to reach a broader audience, as they are displayed in many places across the Google ecosystem.
- Enhanced Targeting: With paid advertising, you have more control over who sees your products, allowing you to target specific audiences, locations, and search terms.
In essence, free listings provide a valuable foundation for your online presence, while paid advertising through Google Merchant Center amplifies your reach and captures the attention of potential customers actively searching for products like yours.
What Is Microsoft Merchant Center
While we've been delving into the capabilities of Google Merchant Center, it's worth noting that Bing, Microsoft's search engine, also offers a powerful tool known as Microsoft Merchant Center. Like its Google counterpart, Microsoft Merchant Center is pivotal in driving product listings on the Microsoft network.
Google vs. Microsoft Merchant Center: A Comparison
Free and Paid Listings
Both Google Merchant Center and Bing Merchant Center offer the dual capability of free and paid listings through their respective advertising campaigns—Google Shopping Ads for Google and Bing Shopping Ads for Bing.
- Free Listings: Both platforms allow you to list your products for free. This means that potential customers can discover your products when searching on Google or Bing without you incurring any advertising costs.
- Paid Listings: Like Google, Bing offers paid advertising opportunities through Bing Shopping Ad campaigns. These paid ads can give your products more prominent visibility and reach on the respective search engines.
Similar Functionality
In terms of functionality, both platforms share several similarities:
- Product Information: Both Google Merchant Center and Bing Merchant Center act as repositories for your product information, including titles, descriptions, images, and pricing.
- Integration: They integrate seamlessly with their respective ad platforms, Google Ads and Microsoft Advertising (formerly known as Bing Ads).
Key Differences
While Google and Bing Merchant Centers have much in common, there are key differences to consider:
- Audience: Google has a larger share of the search engine market, making it a go-to platform for businesses aiming to reach a vast audience. Bing, on the other hand, may appeal to specific demographics or industries.
- Competition: Due to its more extensive user base, Google often has more competition for specific product categories. Bing can be a less competitive landscape, potentially resulting in lower advertising costs.
- Market Reach: Depending on your target audience and market reach, consider using one platform over the other or even leveraging both to maximise your product's visibility.
- Traffic Analytics: Microsoft Merchant Center doesn't offer seamless integration with Google Analytics 4 as Google Merchant Center does.
When to Use Each Platform
Ultimately, the choice between Google Merchant Center and Bing Merchant Center depends on your business goals and target audience. Google may be the preferred choice if you're looking to cast a wide net and reach a global audience. Conversely, if you have a niche market or want to explore a less competitive landscape, Bing is a strategic option.
Now that you understand what Google Merchant Center is and its importance, let's dive into the practical aspects. In the following sections, we will guide you through the steps to set up Merchant Center, connect it to your e-commerce platform, and optimise your product listings for success.
How To Set Up Google Merchant Center
Setting up your Google Merchant Center account is the first crucial step toward harnessing the power of Google's advertising ecosystem for your e-commerce business.
Follow this step-by-step Google merchant center setup guide to get started.
Step 1 - Sign Up for Google Merchant Center
First, head to Google Merchant Center and click "Sign Up for Free."
Google will now walk you through the initial setup process for your Merchant Center account.
Step 2 - Add Your Business Information to Google Merchant Center
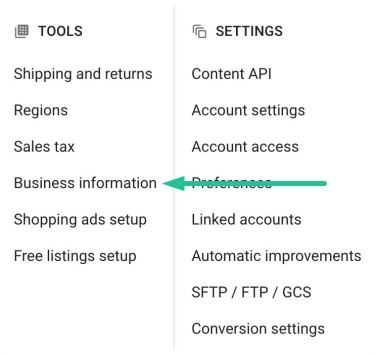
Click the Tools & Settings icon on the top right of your screen. In the pop-up menu under Tools, select "Business Information."
Under the "About Your Business" tab, provide all the relevant information for your business.
Note: It's essential to ensure that the information you enter here matches what's on your website to avoid any Google Merchant Center issues during Google's review.
Claiming & Verifying Your Website in Google Merchant Center
Next, verifying and claiming your business website within Google Merchant Center is crucial. This verification step proves to Google that you are the rightful owner of the website you connect to your account.
Step 4 - Access Website Verification
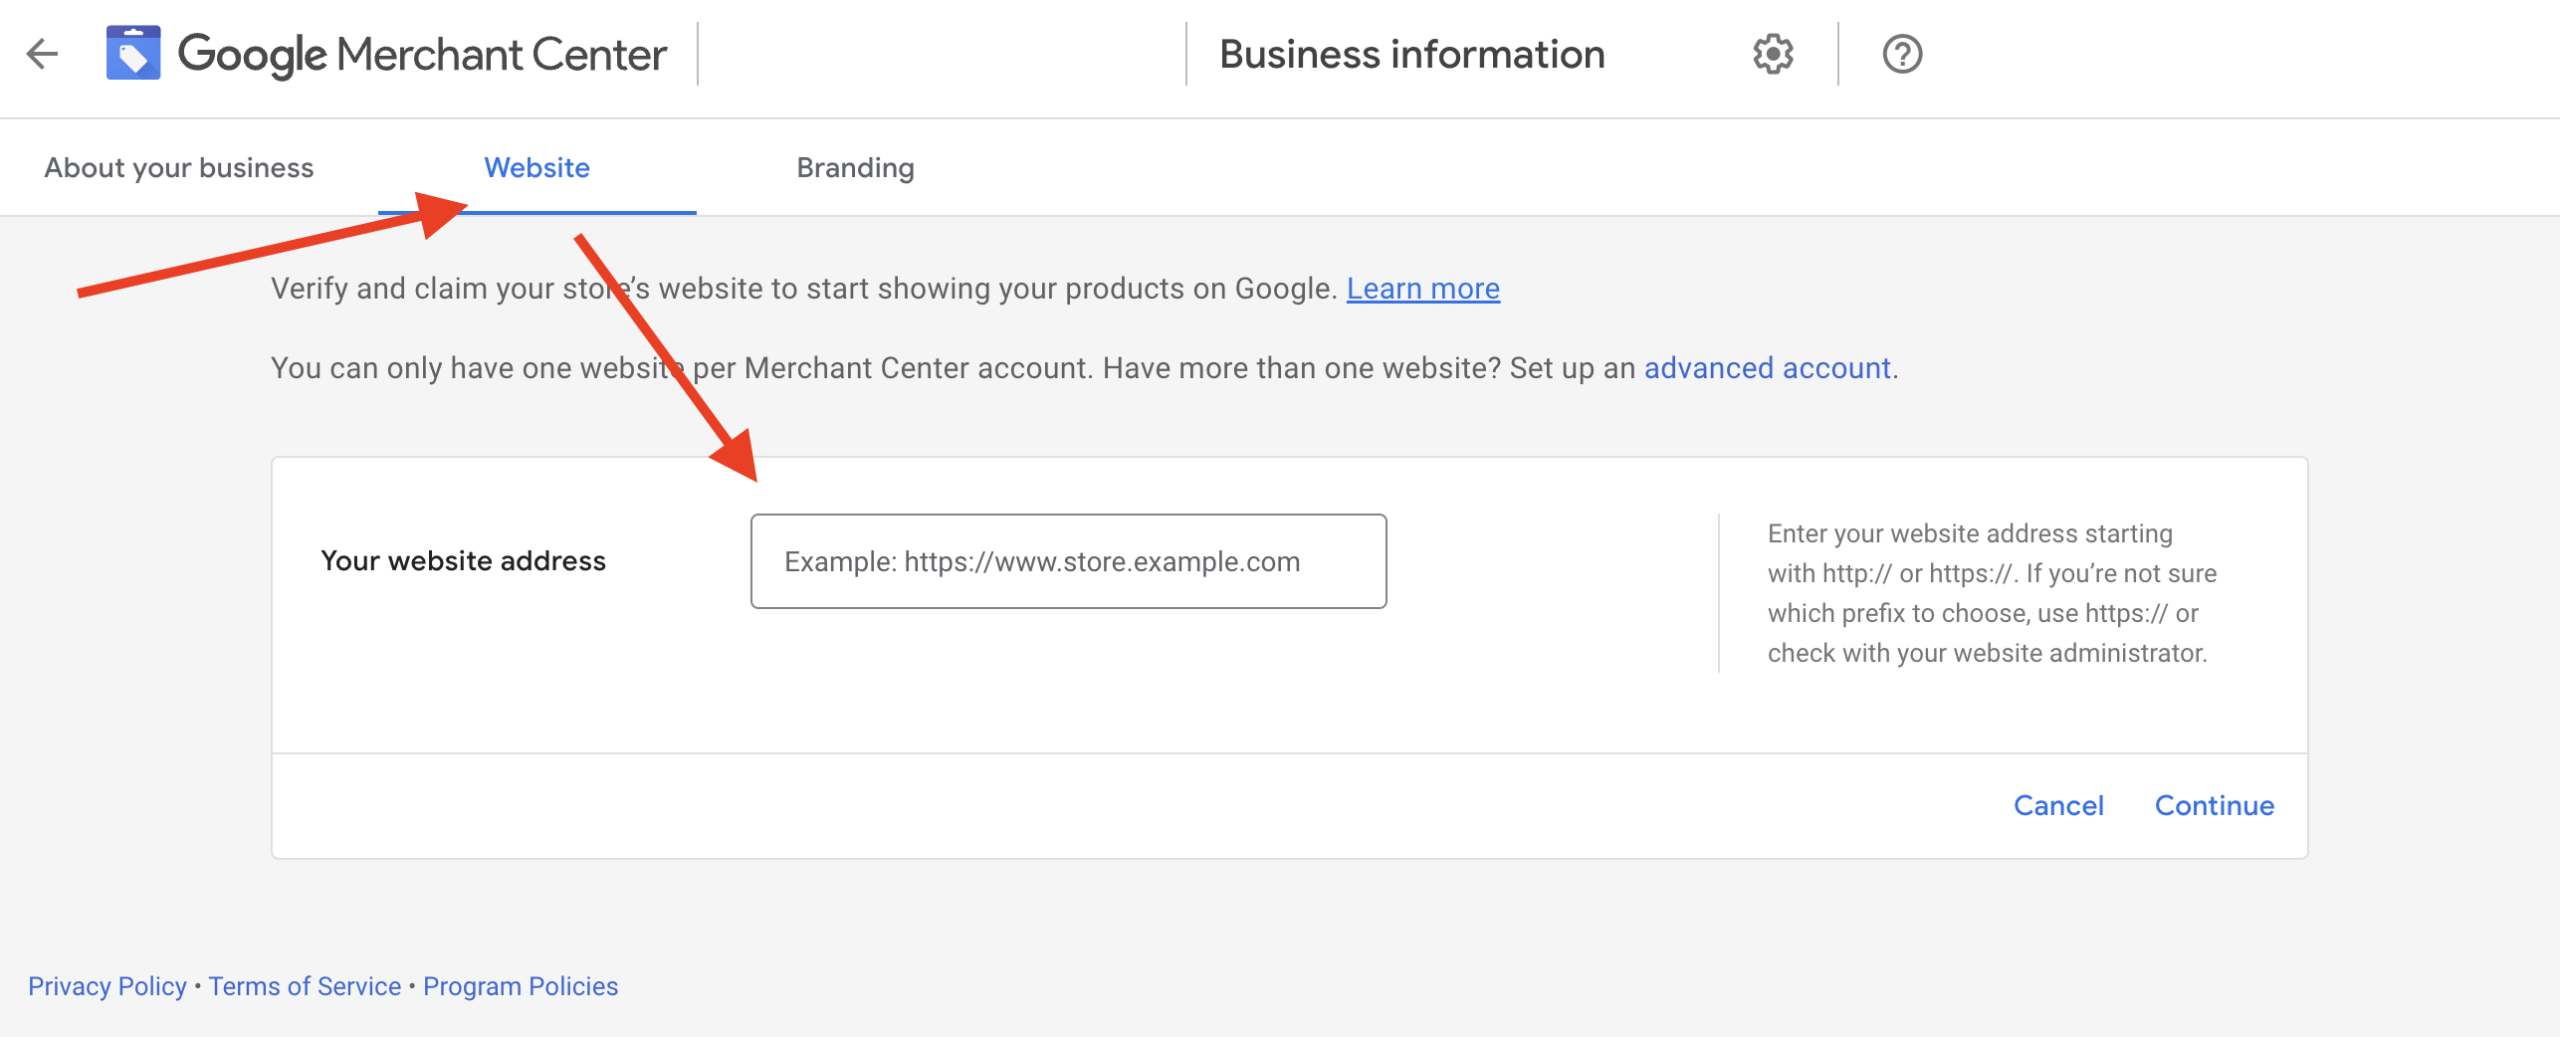
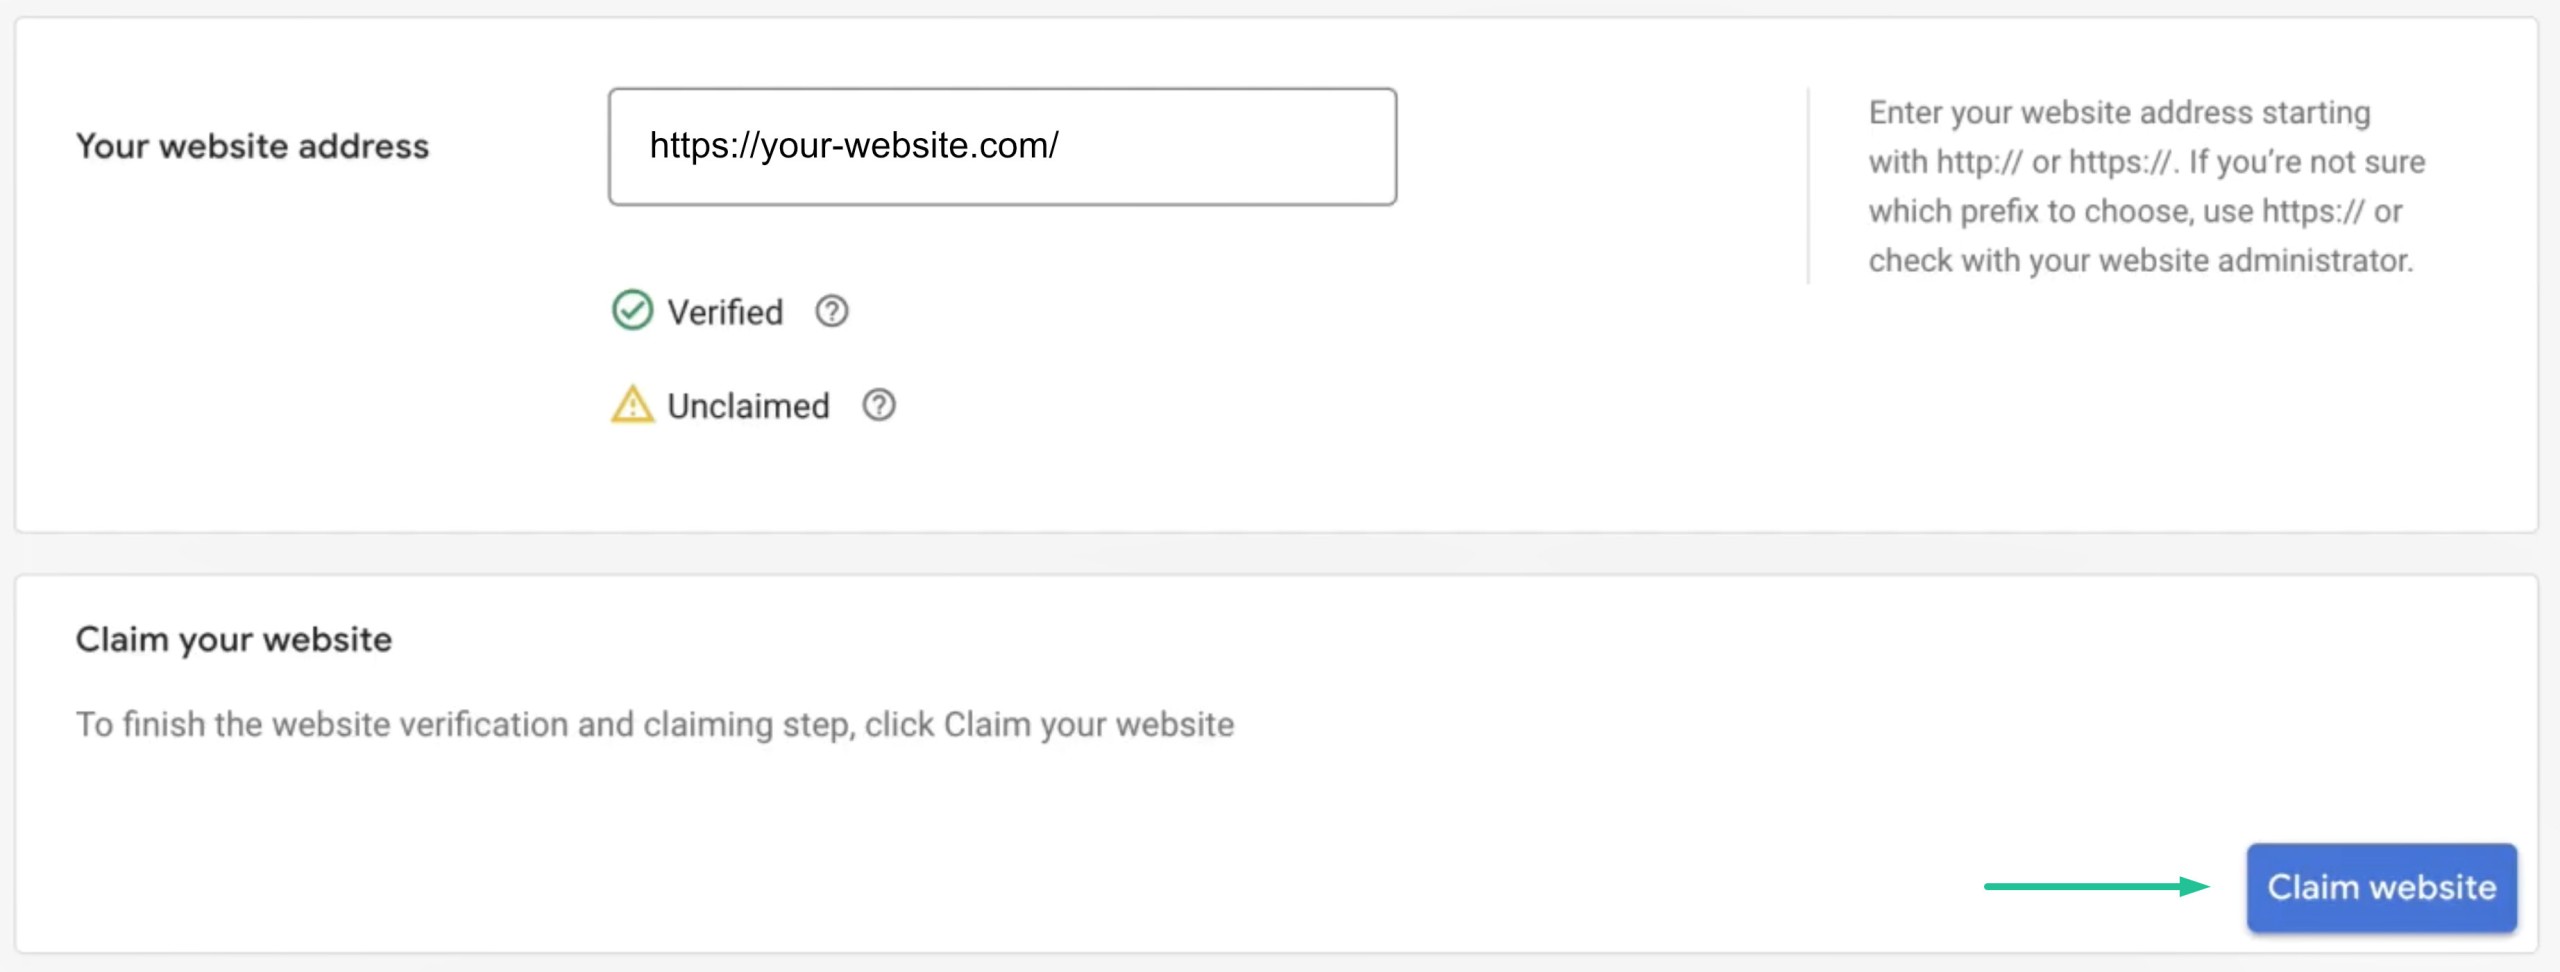
While in the Business Information settings, click the "Website" tab at the top left of the screen.
Enter your website URL, including the first part of the full URL, which is either "https://" or "http://", and click "Continue." You'll see the verification status of your website, which is likely to show as "Unverified" and "Unclaimed" at this point in the process.
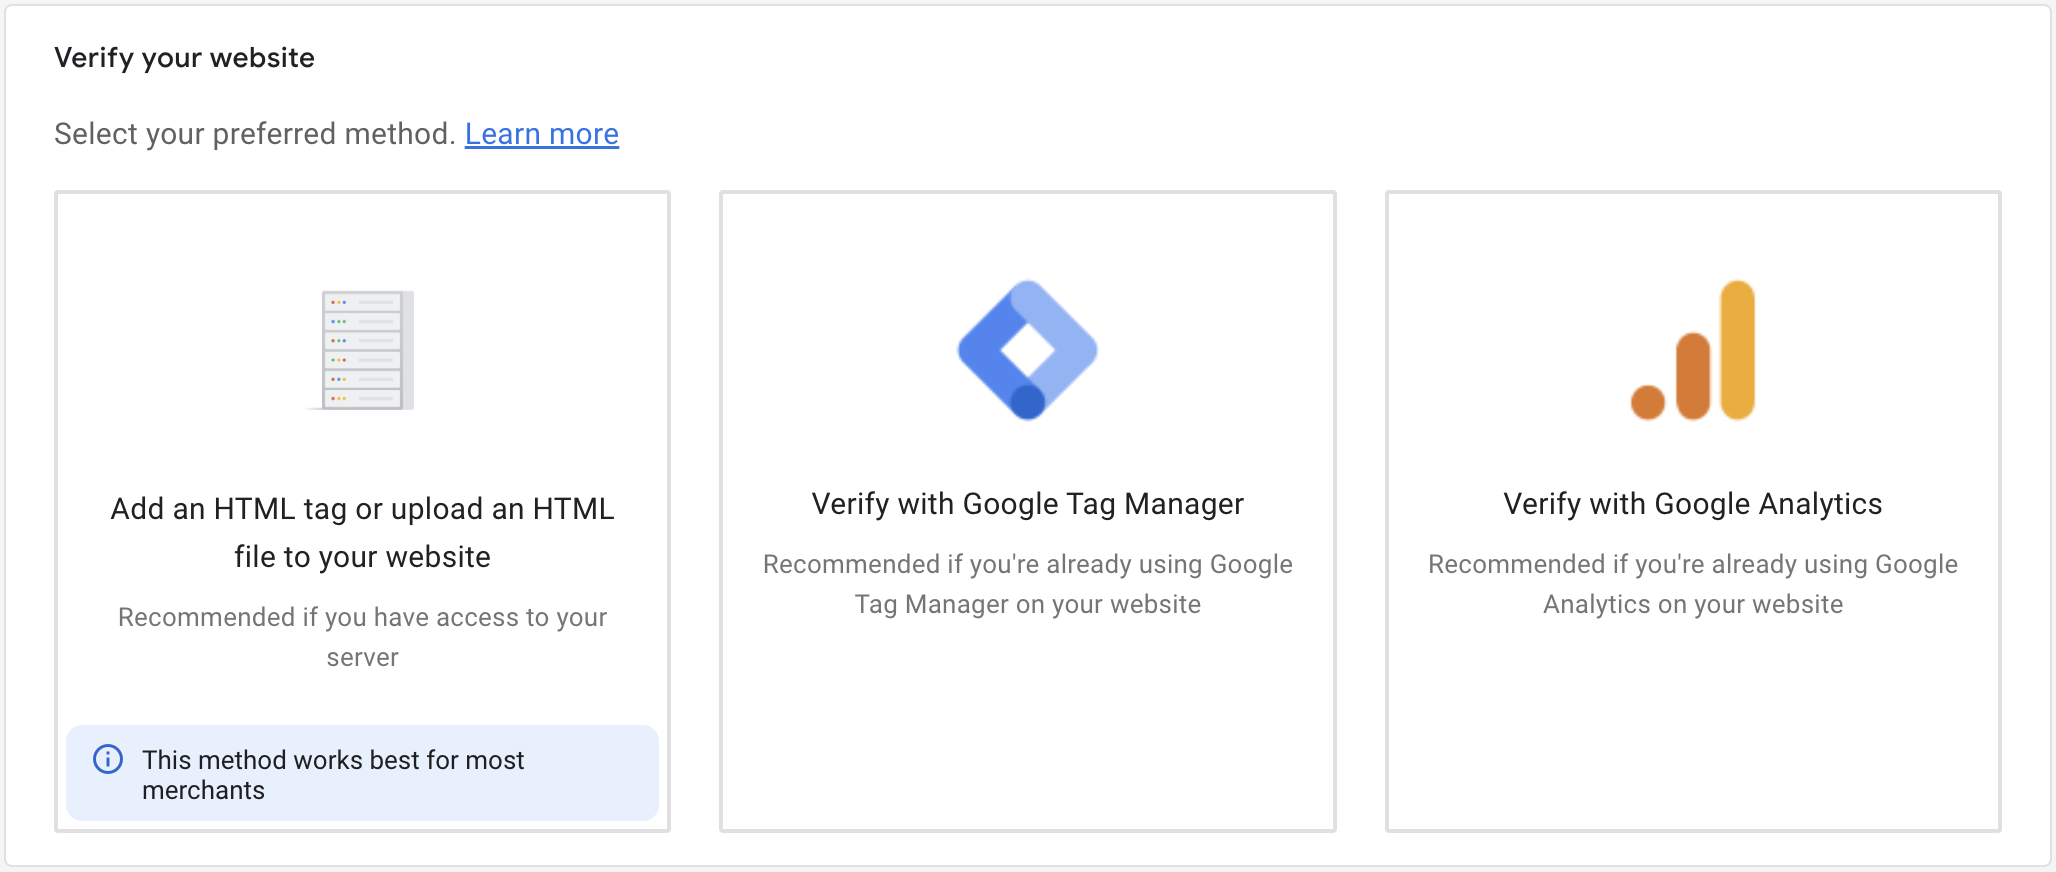
Google Merchant Center offers several options for verifying your website:
- Add an HTML Tag or Upload an HTML File: This method is recommended if you can access your server and place HTML code in your website's source code for Google to verify. This method may require technical knowledge or assistance from a web developer.
- Verify with Google Tag Manager: If you're already using Google Tag Manager on your website, this is a convenient option. Follow the instructions to edit the installation based on Google Merchant Center's guidelines.
- Verify with Google Analytics: This is the easiest method if you have Google Analytics installed. Ensure you have "edit" permissions for your Google Analytics account before using this method.
The verification process may vary depending on your e-commerce platform, with some platforms offering a more straightforward integration process than others.
Step 5 - Complete Verification
After completing the tasks outlined by your chosen verification method, click "Verify website". If you encounter an error message, don't worry; when using the methods that require new tags to be added to your website, these tags can take a few minutes to go live. Wait a few minutes and click "Verify Website" again.
Once you see a green tick indicating your website is verified, click the blue "Claim Website" button to finalise the process.
With your Google Merchant Center account set up and your website claimed and verified, you're well on your way to harnessing the full potential of Google's advertising ecosystem for your e-commerce business.
How To Set Up Shipping In Google Merchant Center
Setting up accurate shipping rates in Google Merchant Center is crucial to providing transparency and consistency for your customers. It's also a requirement before your products are approved to show across Google's network.
Here's how to add shipping rates to your Google Merchant Center account:
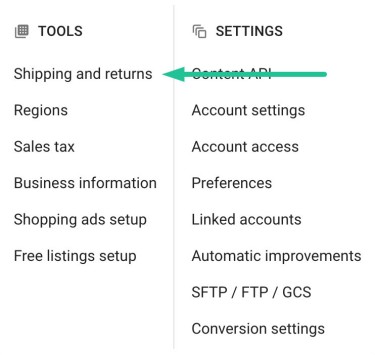
Step 1 - Access Shipping and Returns Settings
Click the "Tools and settings" icon on the top right of your screen. Under the "Tools" section, select "Shipping and Returns."
Step 2 - Add Shipping Service
Click "Add shipping service," and Google Merchant Center will guide you.
- Give your shipping service an identifiable name (for internal use only).
- Select the countries to which this service will apply.
- Ensure your currency is correctly set. (It matches the currency used in your product catalogue).
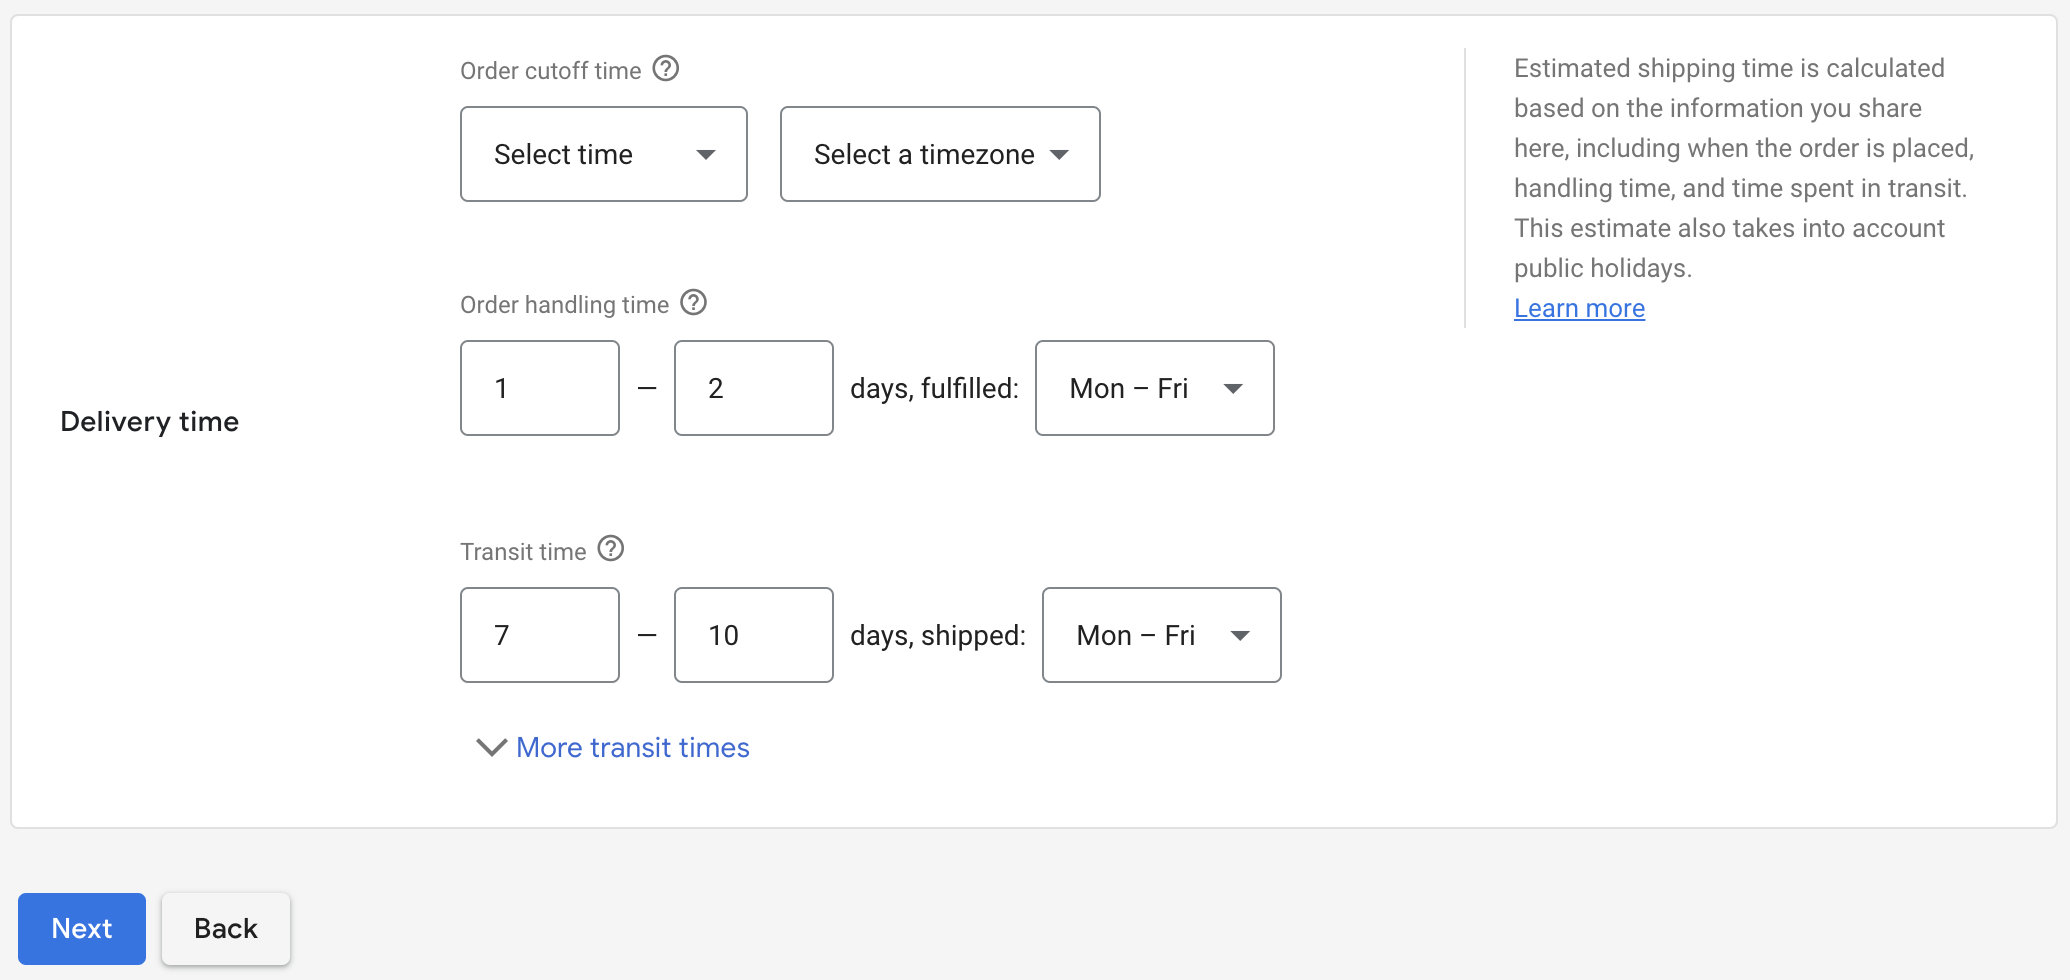
Step 3 - Specify Shipping Times
Fill out your order cut-off time, handling time, and transit time.
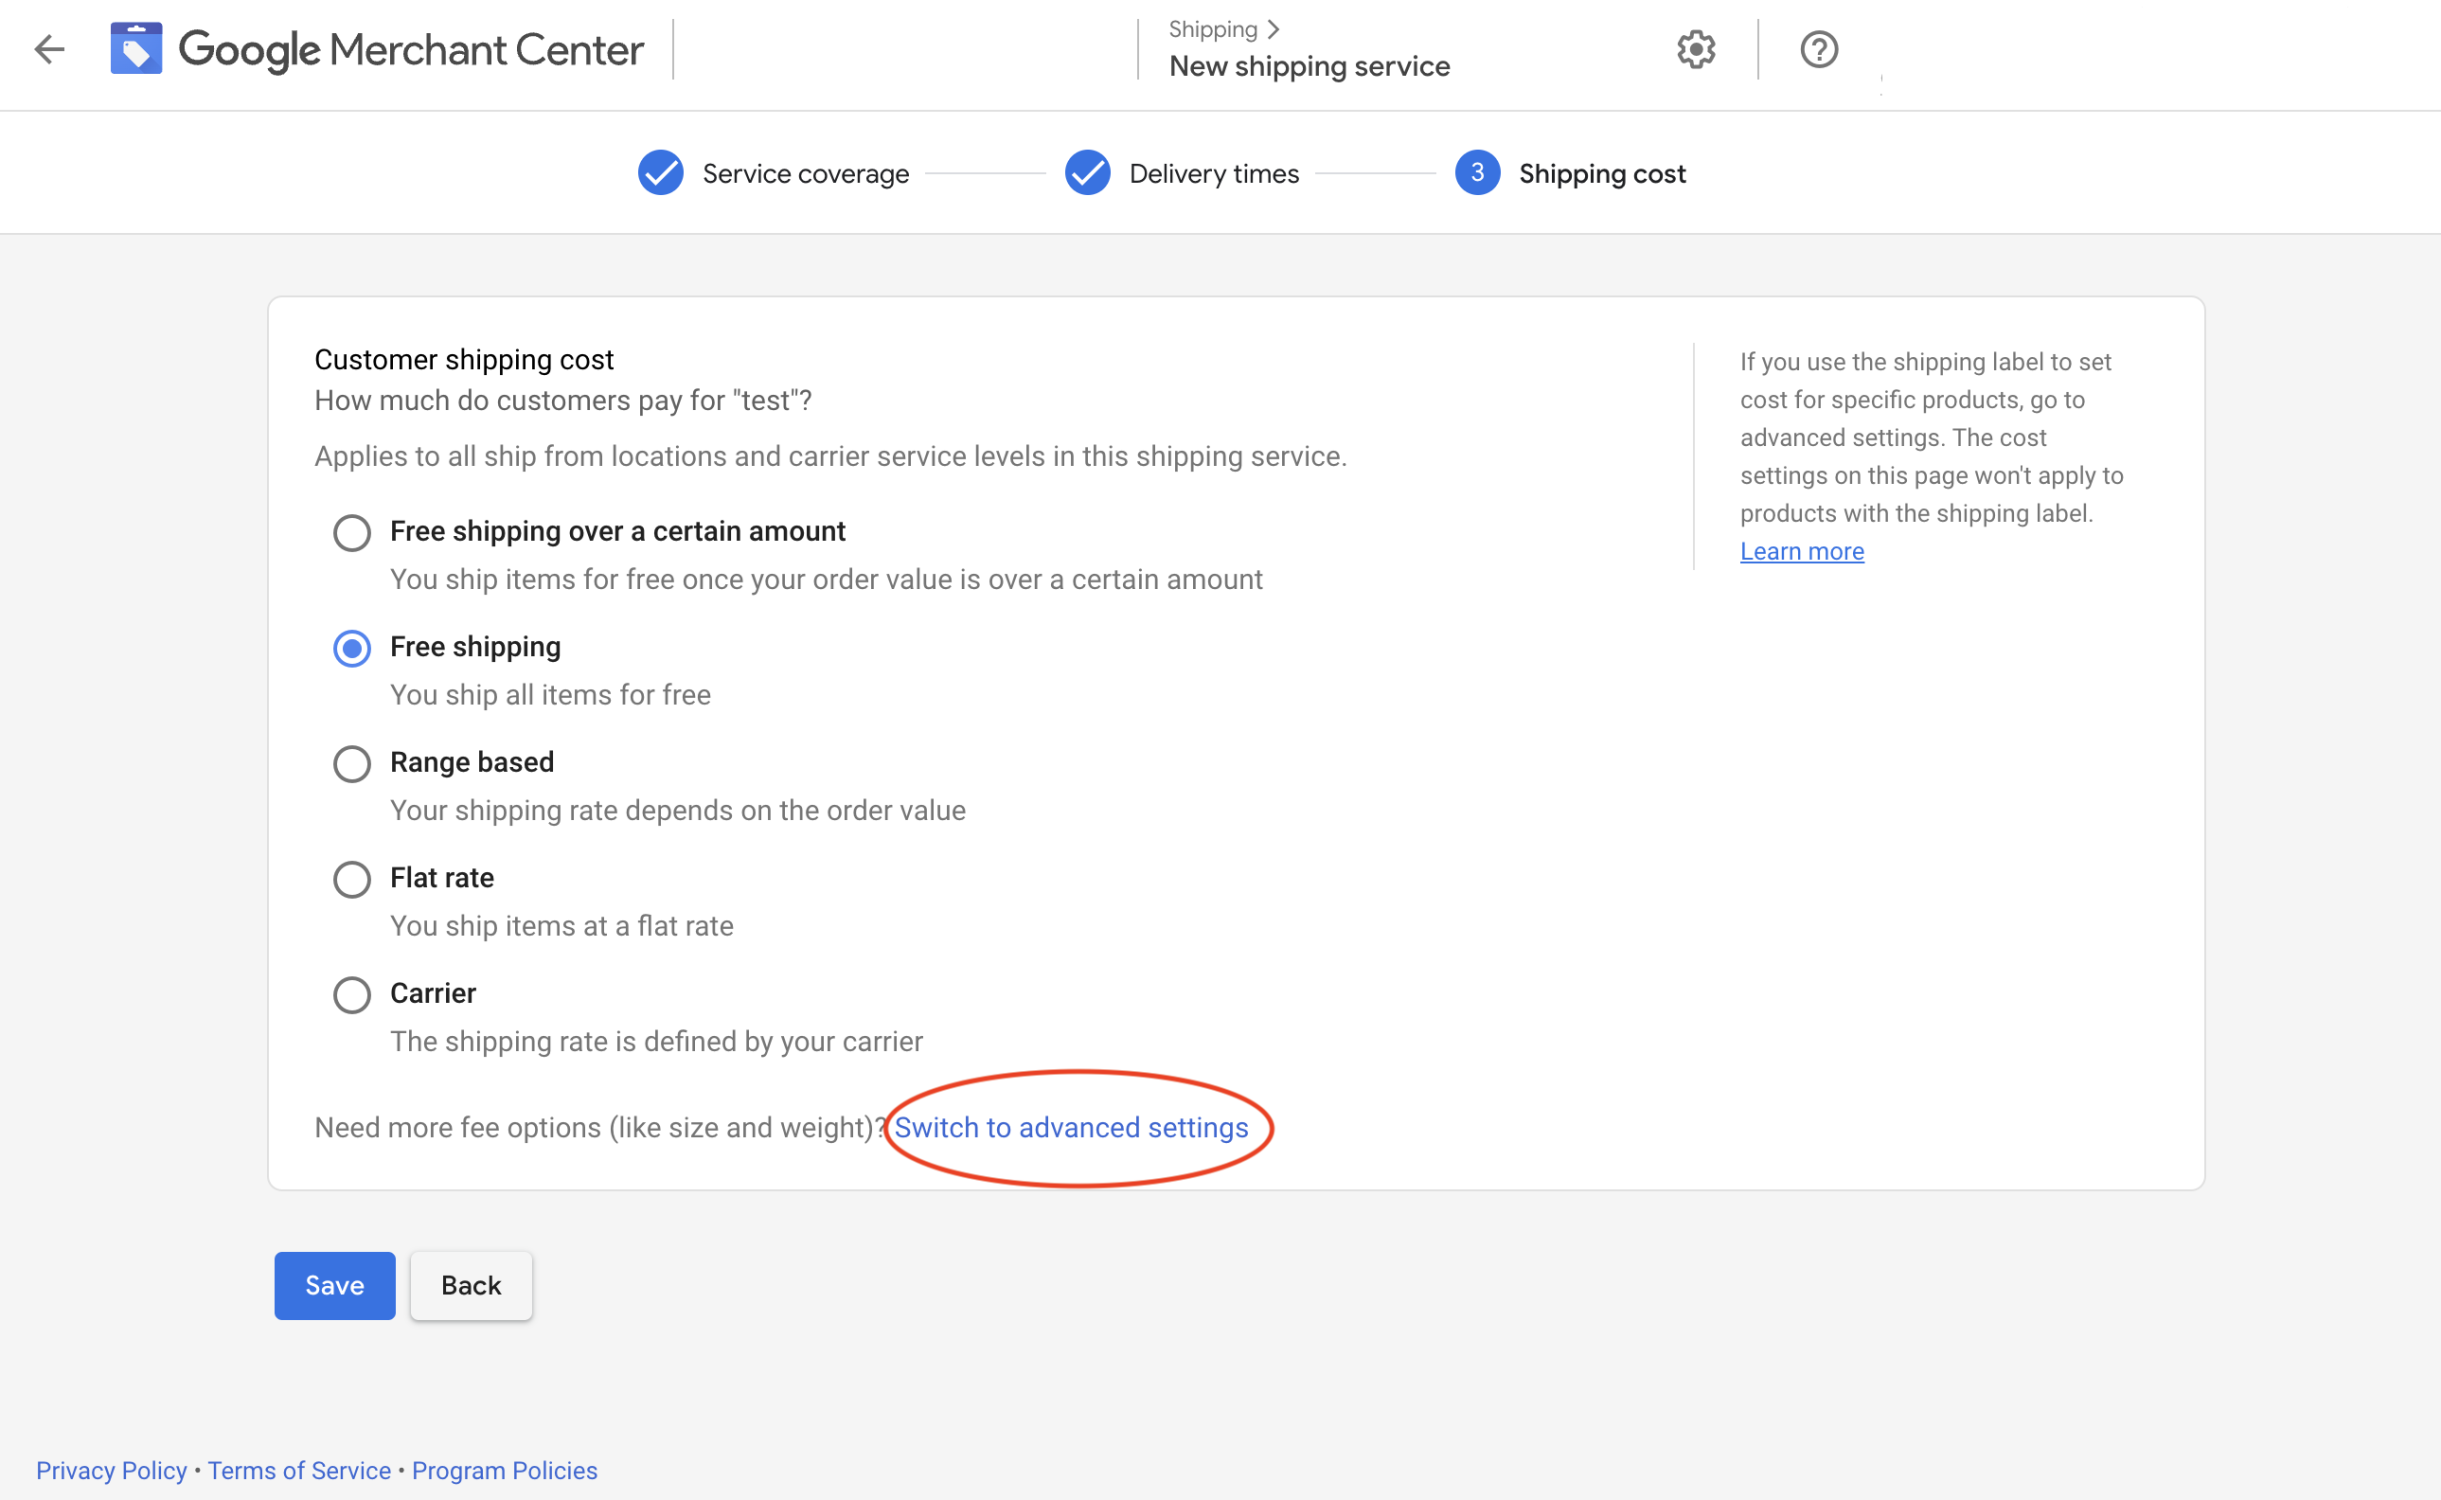
Step 4 - Set Shipping Costs
In the next step, set your shipping cost. You must ensure that the shipping charges for each product on your website match those in your Merchant Center account. Google checks this, and any mismatch will result in product disapproval or, worst cases, suspension of the whole account.
The core options for shipping rates in Marchant Center are:
- Free Shipping Over a Certain Order Value: Ship items for free once the order value reaches a specified amount. You can set the threshold order value and a flat-rate shipping charge for orders below the threshold.
- Free Shipping: Ship all items for free, regardless of order value or product sold.
- Range-Based: Shipping rates vary based on the order value. Set threshold values for shipping rate changes and add multiple order value ranges.
- Flat Rate: Ship items at a flat rate for all orders, regardless of order value.
- Carrier: Shipping rates are defined by preset plans from popular carriers, with the option of adjustment if a discount has been negotiated. You must specify the origin postcode for an accurate rate application.
Setting Volumetric Shipping Rates - Advanced Shipping Settings In Google Merchant Center
Advanced shipping settings in Google Merchant Centre are essential for businesses with more complex shipping calculations, like volumetric shipping.
To access advanced shipping settings, click the link to "switch to advanced settings" below the basic shipping options described above.
In advanced settings, you can set shipping rates for all orders or create a table by selecting a dimension:
- - Order Value
- - Order Weight
- - Number of Items
- - Destination by Postal Code
These dimensions can also be combined to create intricate shipping rates. For example, if you need to base your shipping on weight and order value, you can set different thresholds to apply different rates in each scenario.
The table below illustrates how this might be set out if shipping rates vary by order value for two different weight ranges.
| Order Weight | Order Value Under $100 | Order Value Over $100 |
|---|---|---|
| 0.0001 kg to 20 kg | $10.99 | $6.99 |
| 20.0001 kg or heavier | $19.99 | $14.99 |
How To Add Returns & Refund Information To Google Merchant Center
Transparency in returns and refunds is vital for customer trust. Here's how to add returns and refund information to your Google Merchant Center account:
Step 1 - Access Returns Information Section
From the "Shipping and Returns" page, select the "Returns" tab on the top left of the screen.
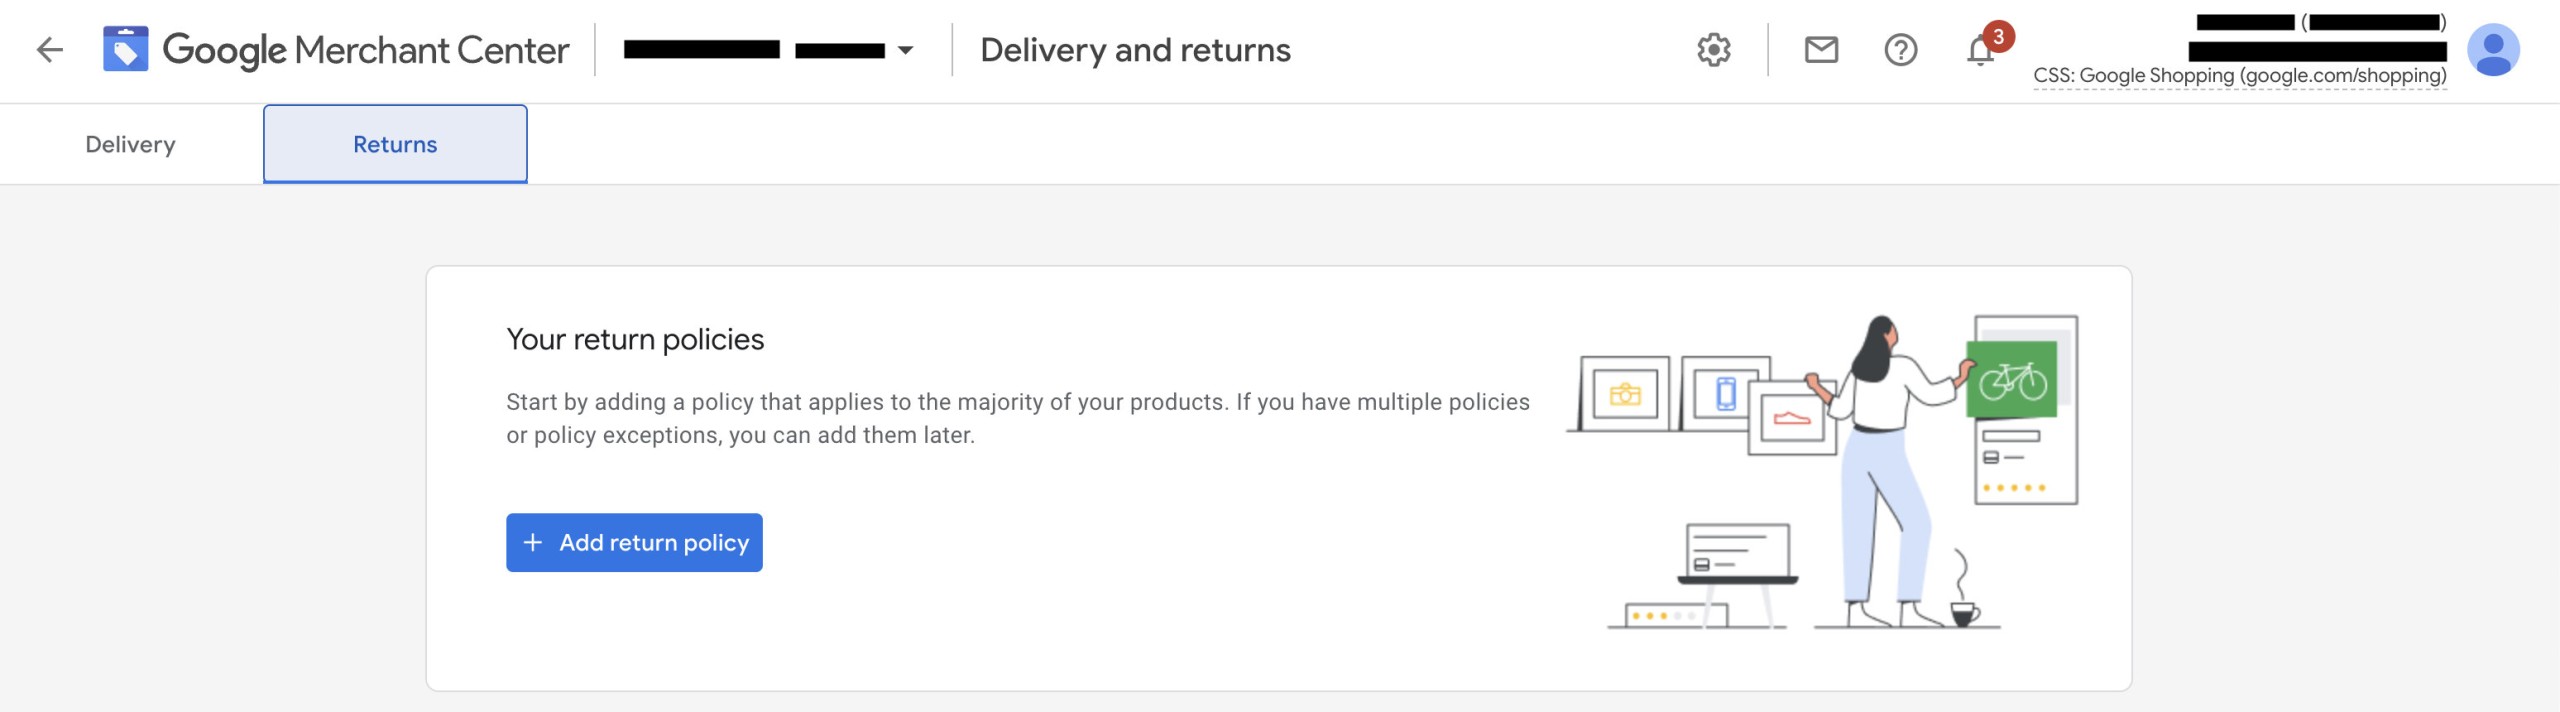
Step 2 - Add Return Policy
Click "+ Add Return Policy" and follow the steps.
Multiple Policies for Multiple Countries: You can repeat the process for your business locations if you have different policies for various countries. However, applying this only to the places you intend to advertise is crucial.
Caution: Remember, if you change your returns policy on your website, ensure that you update Merchant Center settings to reflect those changes. Failing to do so can result in disapproval or suspension of your Merchant Center account.
With these shipping and returns settings configured in Google Merchant Center, you can provide customers with clear, consistent, and trustworthy information regarding shipping charges and return policies.
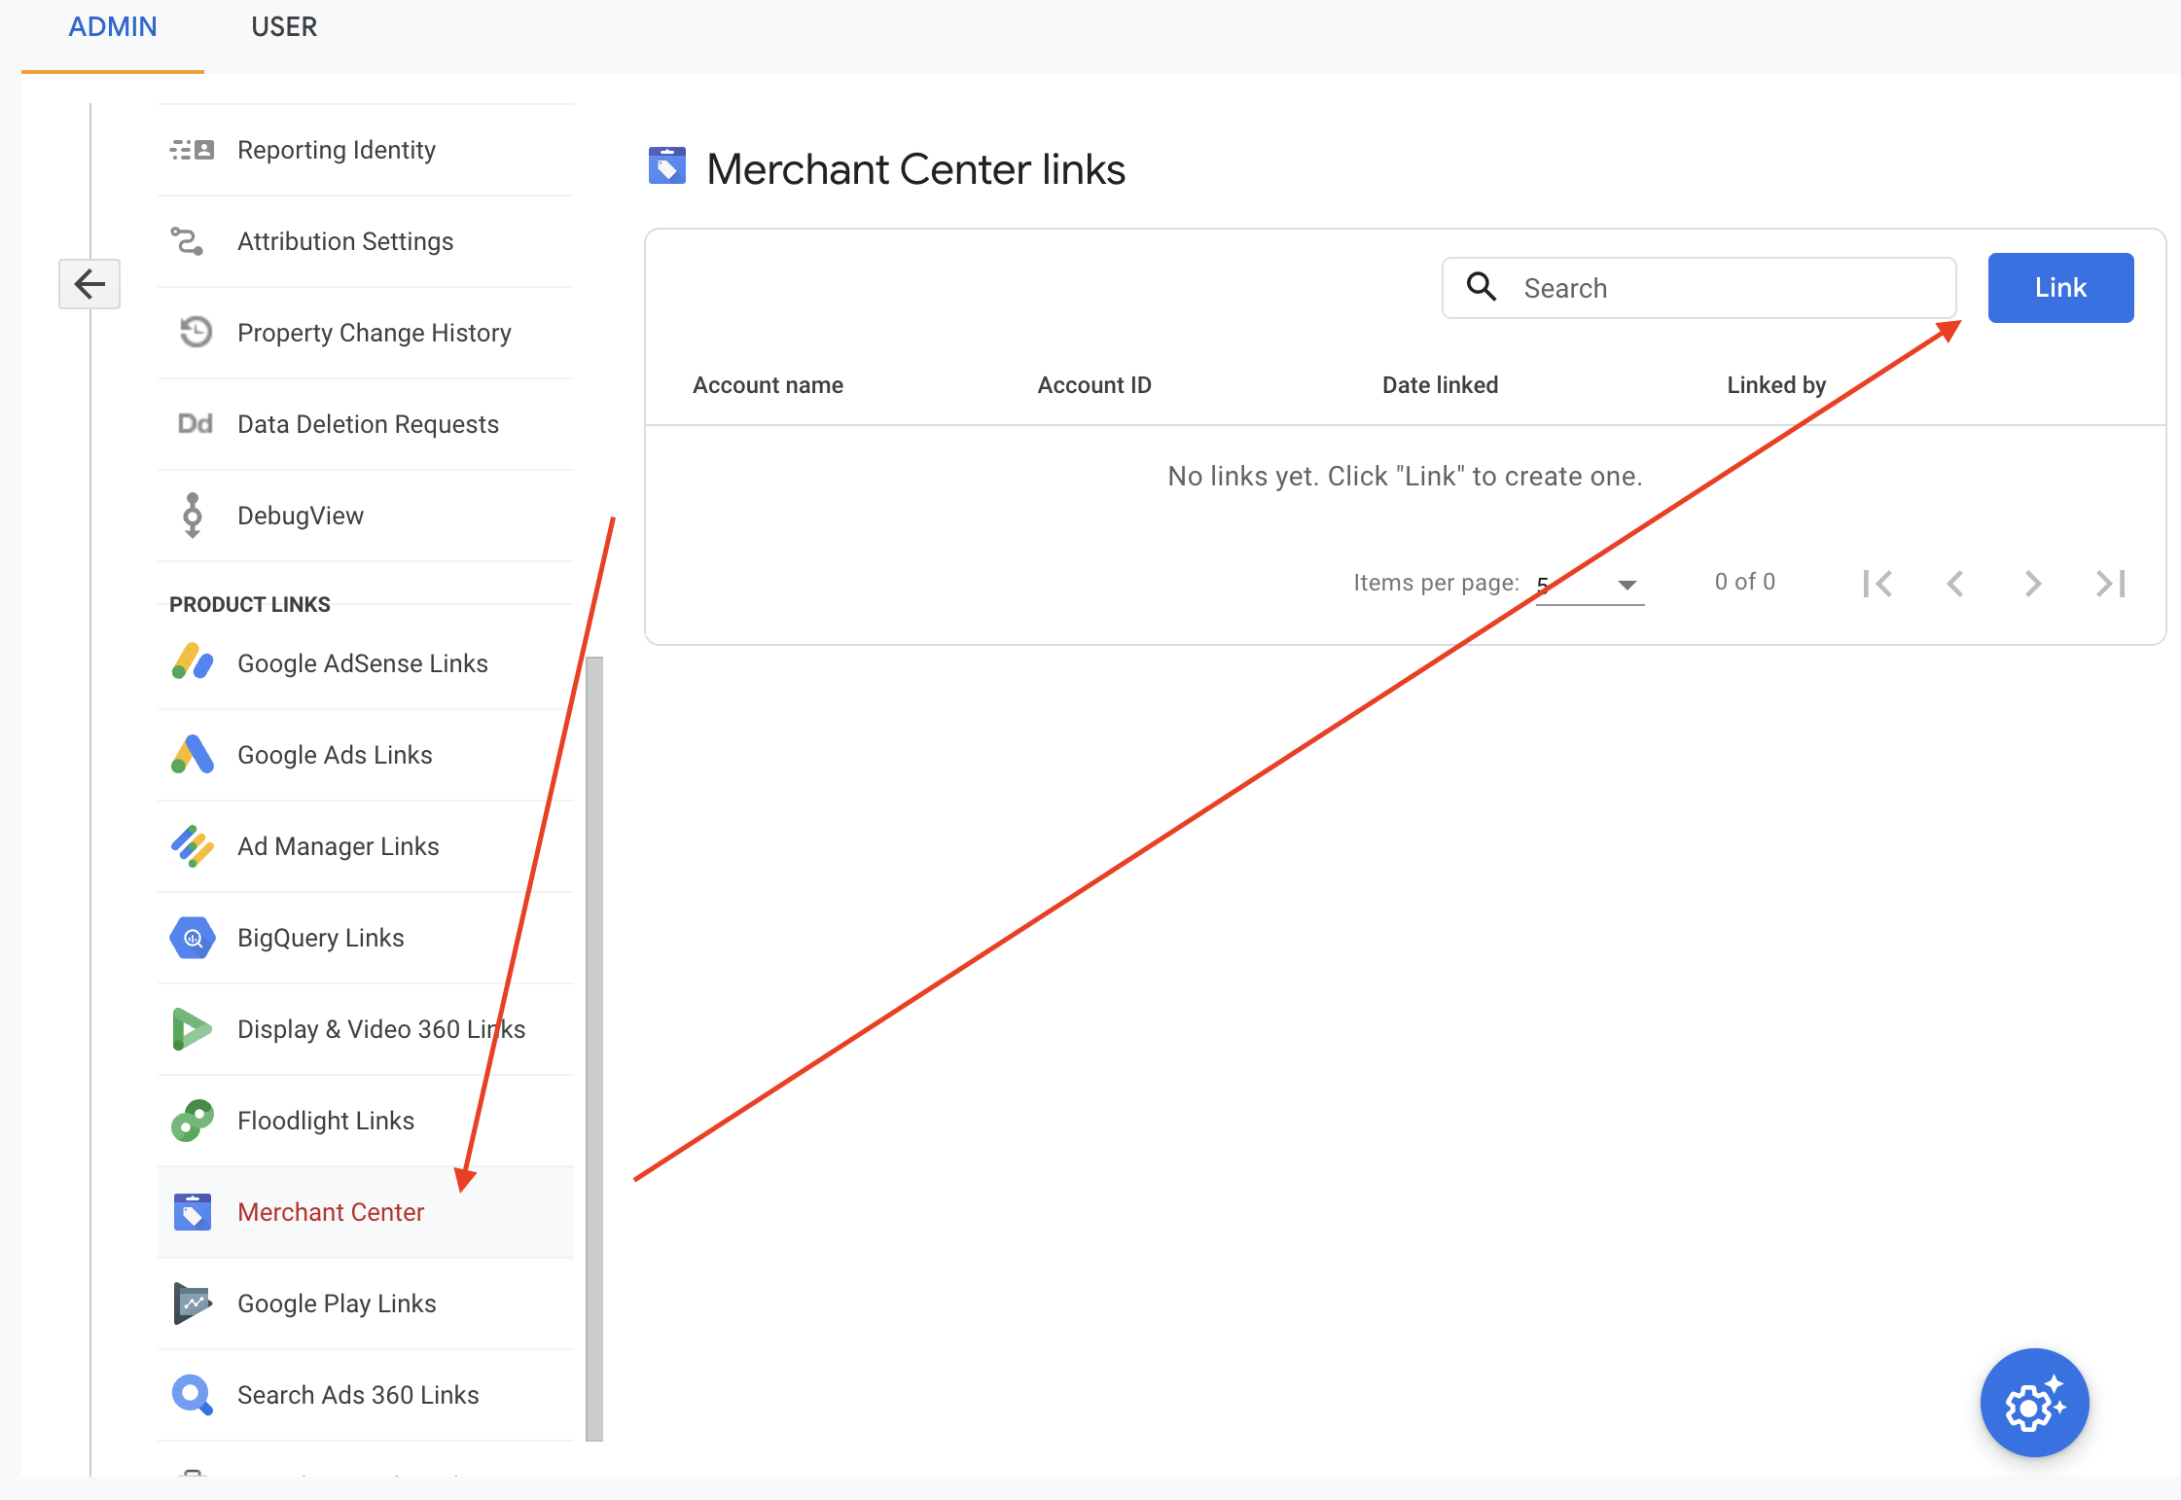
How To Link Google Merchant Center to Google Ads
If you plan to maximise the visibility of your product listings through sponsored ads, you must link Merchant Center to Google Ads. This connection allows you to manage campaign budgets, bidding, and promoting specific products within Google Ads.
Here's how to link your Google Merchant Center account to your Google Ads account:
Step 1 - Access Linked Accounts in Google Merchant Center
On the top right of your Google Merchant Center screen, click the "Tools and Settings" icon to open the Tools and Settings menu.
In the Tools and Settings menu, under "Settings", select "Linked accounts."
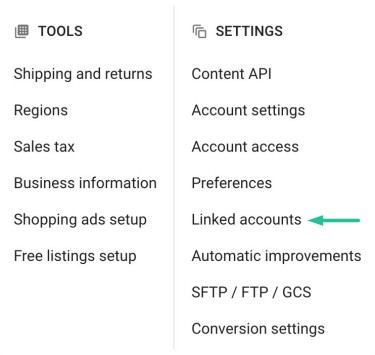
Step 2 - Select Google Ads as the Linked Account
In the next screen, make sure you have the "Google Ads" tab selected.

Step 3 - Locate Your Google Ads Customer ID
Under your Google Ads Account list, find the Google Ads customer ID associated with the Google Ads account you want to link.
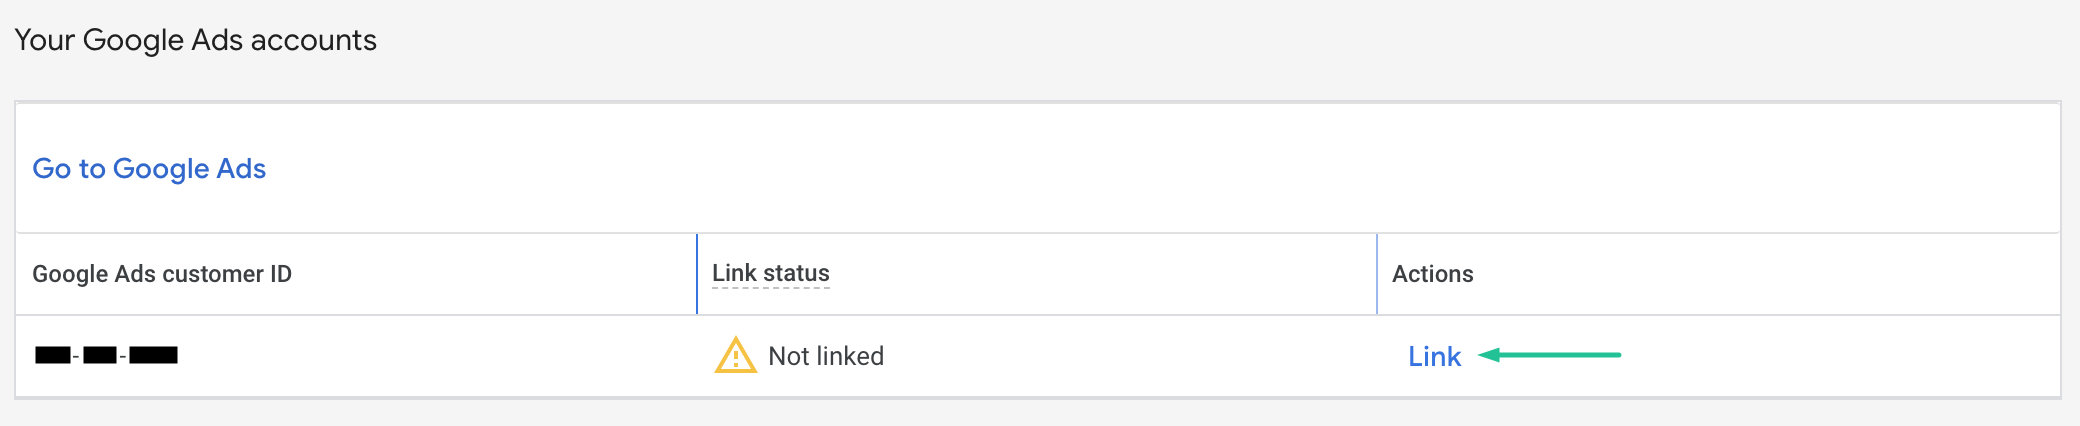
Step 4 - Initiate the Linking Process
Click "Link" under the 'Actions' column next to the Google Ads account you want to connect.
Google Merchant Center will request to link with your Google Ads account. This step is crucial to verify that you are the owner or an authorised user of the Ads account you're attempting to link.
Step 5 - Verify the Link in Google Ads
You must sign in to your Google Ads account for the next verification step.
Click "Tools and settings" in the top menu in Google Ads. In the pop-up menu, under the Setup section, click "Linked Accounts."
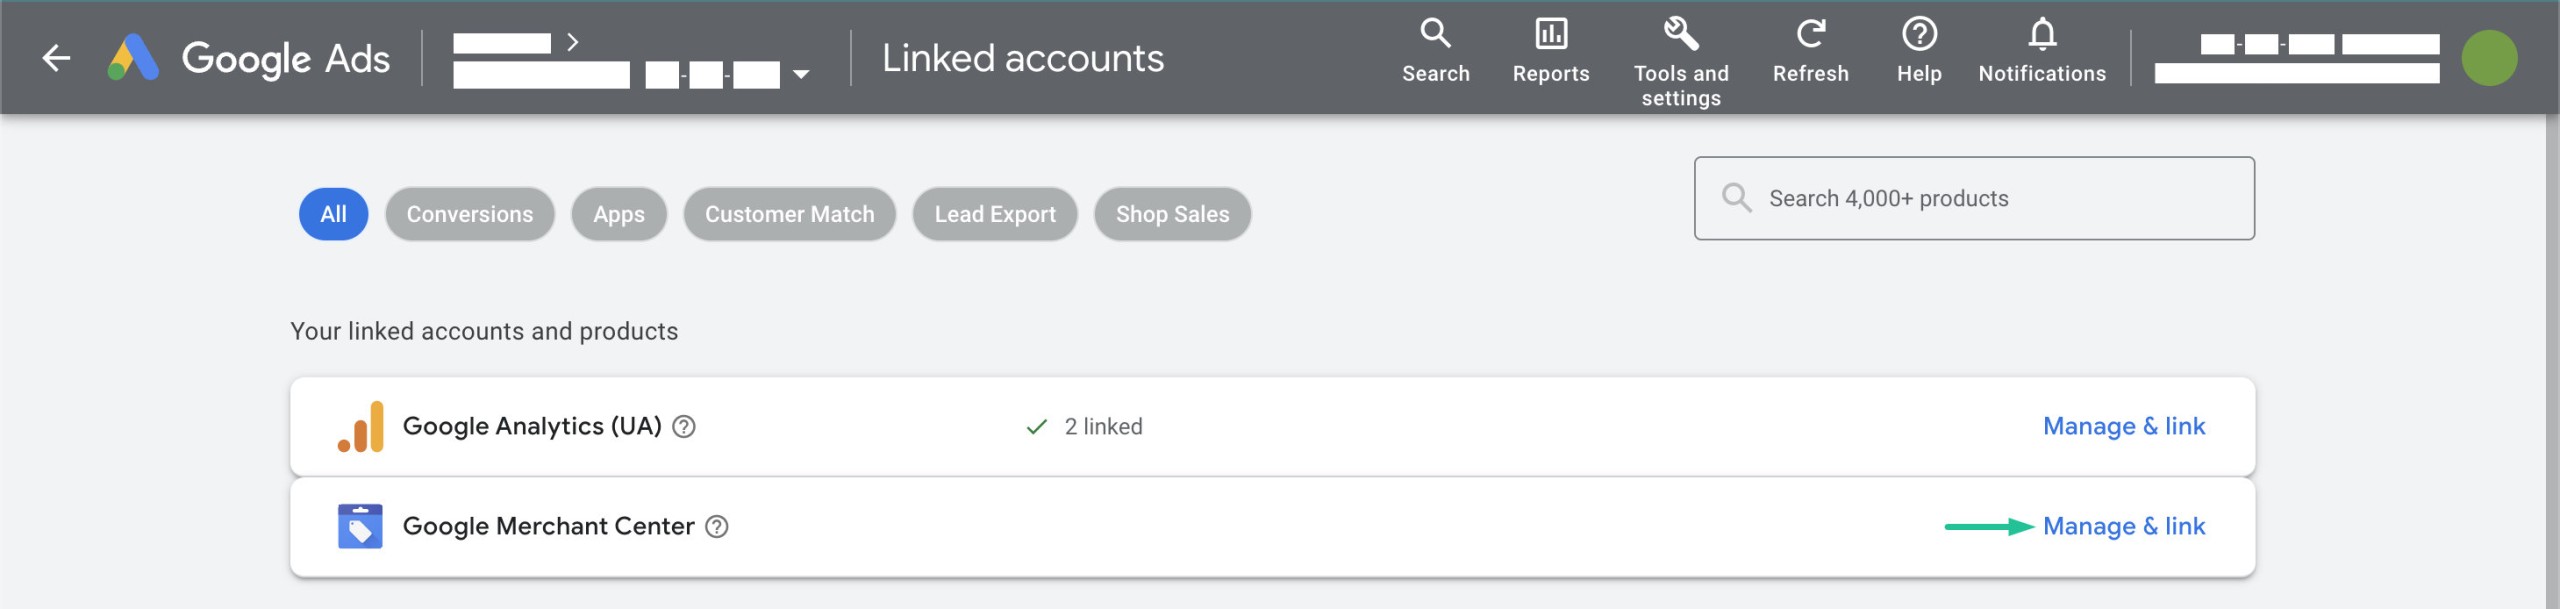
Find Google Merchant Center in the list of accounts and click "Manage & link."
You'll now see a list of accounts. Under the "Actions" column on the right, click "View requests," and then click "Approve" to approve the link that corresponds to your Merchant Center account.
Congratulations, you have successfully linked your Google Ads account and your Google Merchant Center account. This connection enables seamless management of your product listings and campaigns, enhancing visibility and control over your advertising efforts.
The following section will provide steps to add products to the Google Merchant Center.
How To Add Products To Google Merchant Center
To get your product listings onto Google Shopping, whether you're aiming for free listings or product listing ads, you need to provide Google Merchant Center with your product information.
This is achieved by connecting a Shopping Feed with Merchant Center.
What Is A Merchant Center Product Feed (AKA a Shopping Feed)?
A Shopping feed in the context of Google Merchant Center is the data source that contains all the information about your products.
Google Merchant Center offers various ways to provide this feed:
- Google Sheets: You manually create your product feed using a Google spreadsheet, with one line for each product. Updates made in the spreadsheet are automatically applied to your account. This is suitable for a small inventory but may become time-consuming for more extensive catalogues, as you'll need to sync stock status and pricing changes manually.
- Scheduled Fetch: You host a file on your website containing product data and schedule regular fetches by Google. This method ensures accurate and up-to-date product information but may require technical expertise, especially for non-XML file formats. Most retailers who use this method have the file automatically generated by the website for automated updates applied when products are edited on the website.
- Upload: You maintain a file on your computer containing product data and manually upload it to your Merchant Center account through methods like SFTP or Google Cloud Storage. Similar to Google Sheets, this method requires regular manual updates.
- Content API: If your eCommerce platform supports it, the Content API for Shopping automatically uploads product listings, ensuring they're always up-to-date. However, it may have limitations in optimising data beyond what's on your product detail pages.
Free Report
Spot Errors, See Strategies,
Our Free Report Reveals Key E-Commerce Fixes.
Book Your Call
How To Add A Product Feed To Merchant Center
Below are some steps to complete the Google Merchant Center feed setup. The final stages may vary depending on which method you choose to upload your data to Google.
Step 1 - Login to Your Merchant Center Account
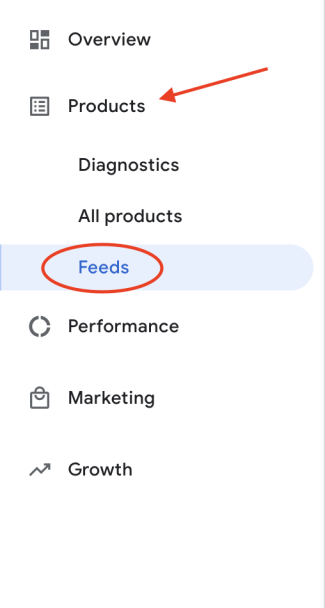
Navigate to the "Products" section and click the "Feeds" submenu.
Step 2 - Add a New Data Feed
Click the blue plus icon to add a new data feed.
![]()
Step 3 - Select Target Countries and Language
Choose your target countries with your product feed and select a language. You can choose multiple countries but only one language per feed.
Step 4 - Choose Destinations
Select the destinations for your product listings. This should include 'Free listings' and, if you plan to use Product Listing Ads, add 'Shopping ads.'
Step 5 - Name Your Product Feed
Give your product feed a descriptive name; this is how it will be listed in your Merchant Center account.
Then, select the method to set up and connect your feed to Merchant Center. Choose from Google Sheets, Scheduled Fetch, Upload, or Content API, depending on your preference.
Step 6 - Complete Setup
You'll be presented with unique options depending on your chosen setup method. Follow the steps to configure your feed source.
If your website runs on popular eCommerce platforms like WooCommerce or Shopify, there are convenient ways to connect your store to Google Merchant Center. Let's explore these integrations.
Merchant Center WooCommerce
WooCommerce offers a Google Merchant Center plugin for WordPress that establishes a direct API connection with Google Merchant Center, automating sending and updating product data.
How To Setup WooCommerce with Google Merchant Center
Step 1 - Install the WooCommerce Google Listings & Ads Plugin
You can access the Plugin here.

Step 2 - Connect The WooCommerce Merchant Center Plugin With WordPress
Connect it to your WordPress account after installing it. You will need to activate it before you can proceed with connecting it to your Google account.
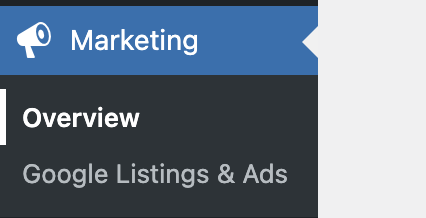
Navigate to where the PlugIn has been installed within your WordPress interface. This is found in the menu under Marketing > Google Listings & Ads.
Then, connect the Plugin with your WordPress account.
With this step complete, the button for connecting with your Google account will become available.
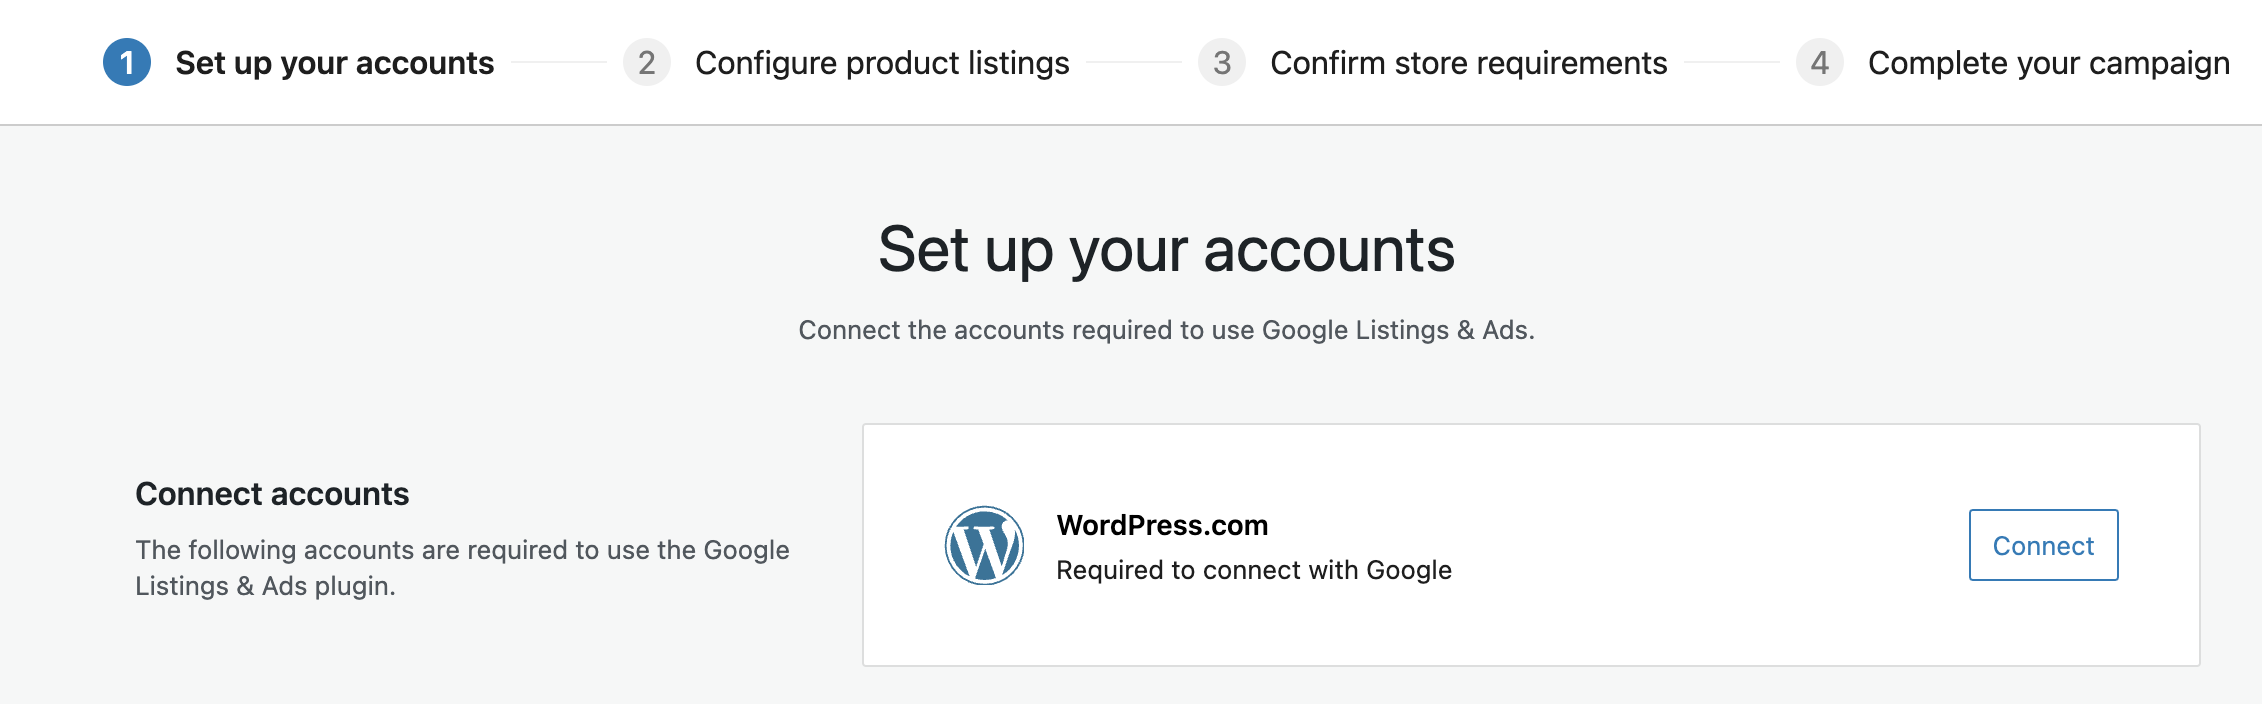
Step 2 - Connect to Google Merchant Center
Connect the Plugin to your Google account after activating it. This must be the same account you use to log in to Google Ads and Google Merchant Center.
With this step complete, it's time to verify and claim your website with your Merchant Center account, which is also managed via the Plugin.
Step 3 - Website Verification
If you are new to Merchant Center, this process will happen automatically when creating your new account.
Step 4 - Check Your Settings In Merchant Center
The Plugin will automatically implement a WooCommerce Google product feed.
Many of the Merchant Center setup processes outlined earlier in this post, such as configuring shipping rates, tax information, and completing your product feed setup, are handled via the Google Listings & Ads Plugin for WooCommerce.
If you have existing settings added to your Merchant Center account, the PlugIn will overwrite them. So, check the settings within your Merchant Center account once this process is complete, and ensure your website complies with all Merchant Center requirements to avoid disapproval or suspension.
Merchant Center Shopify
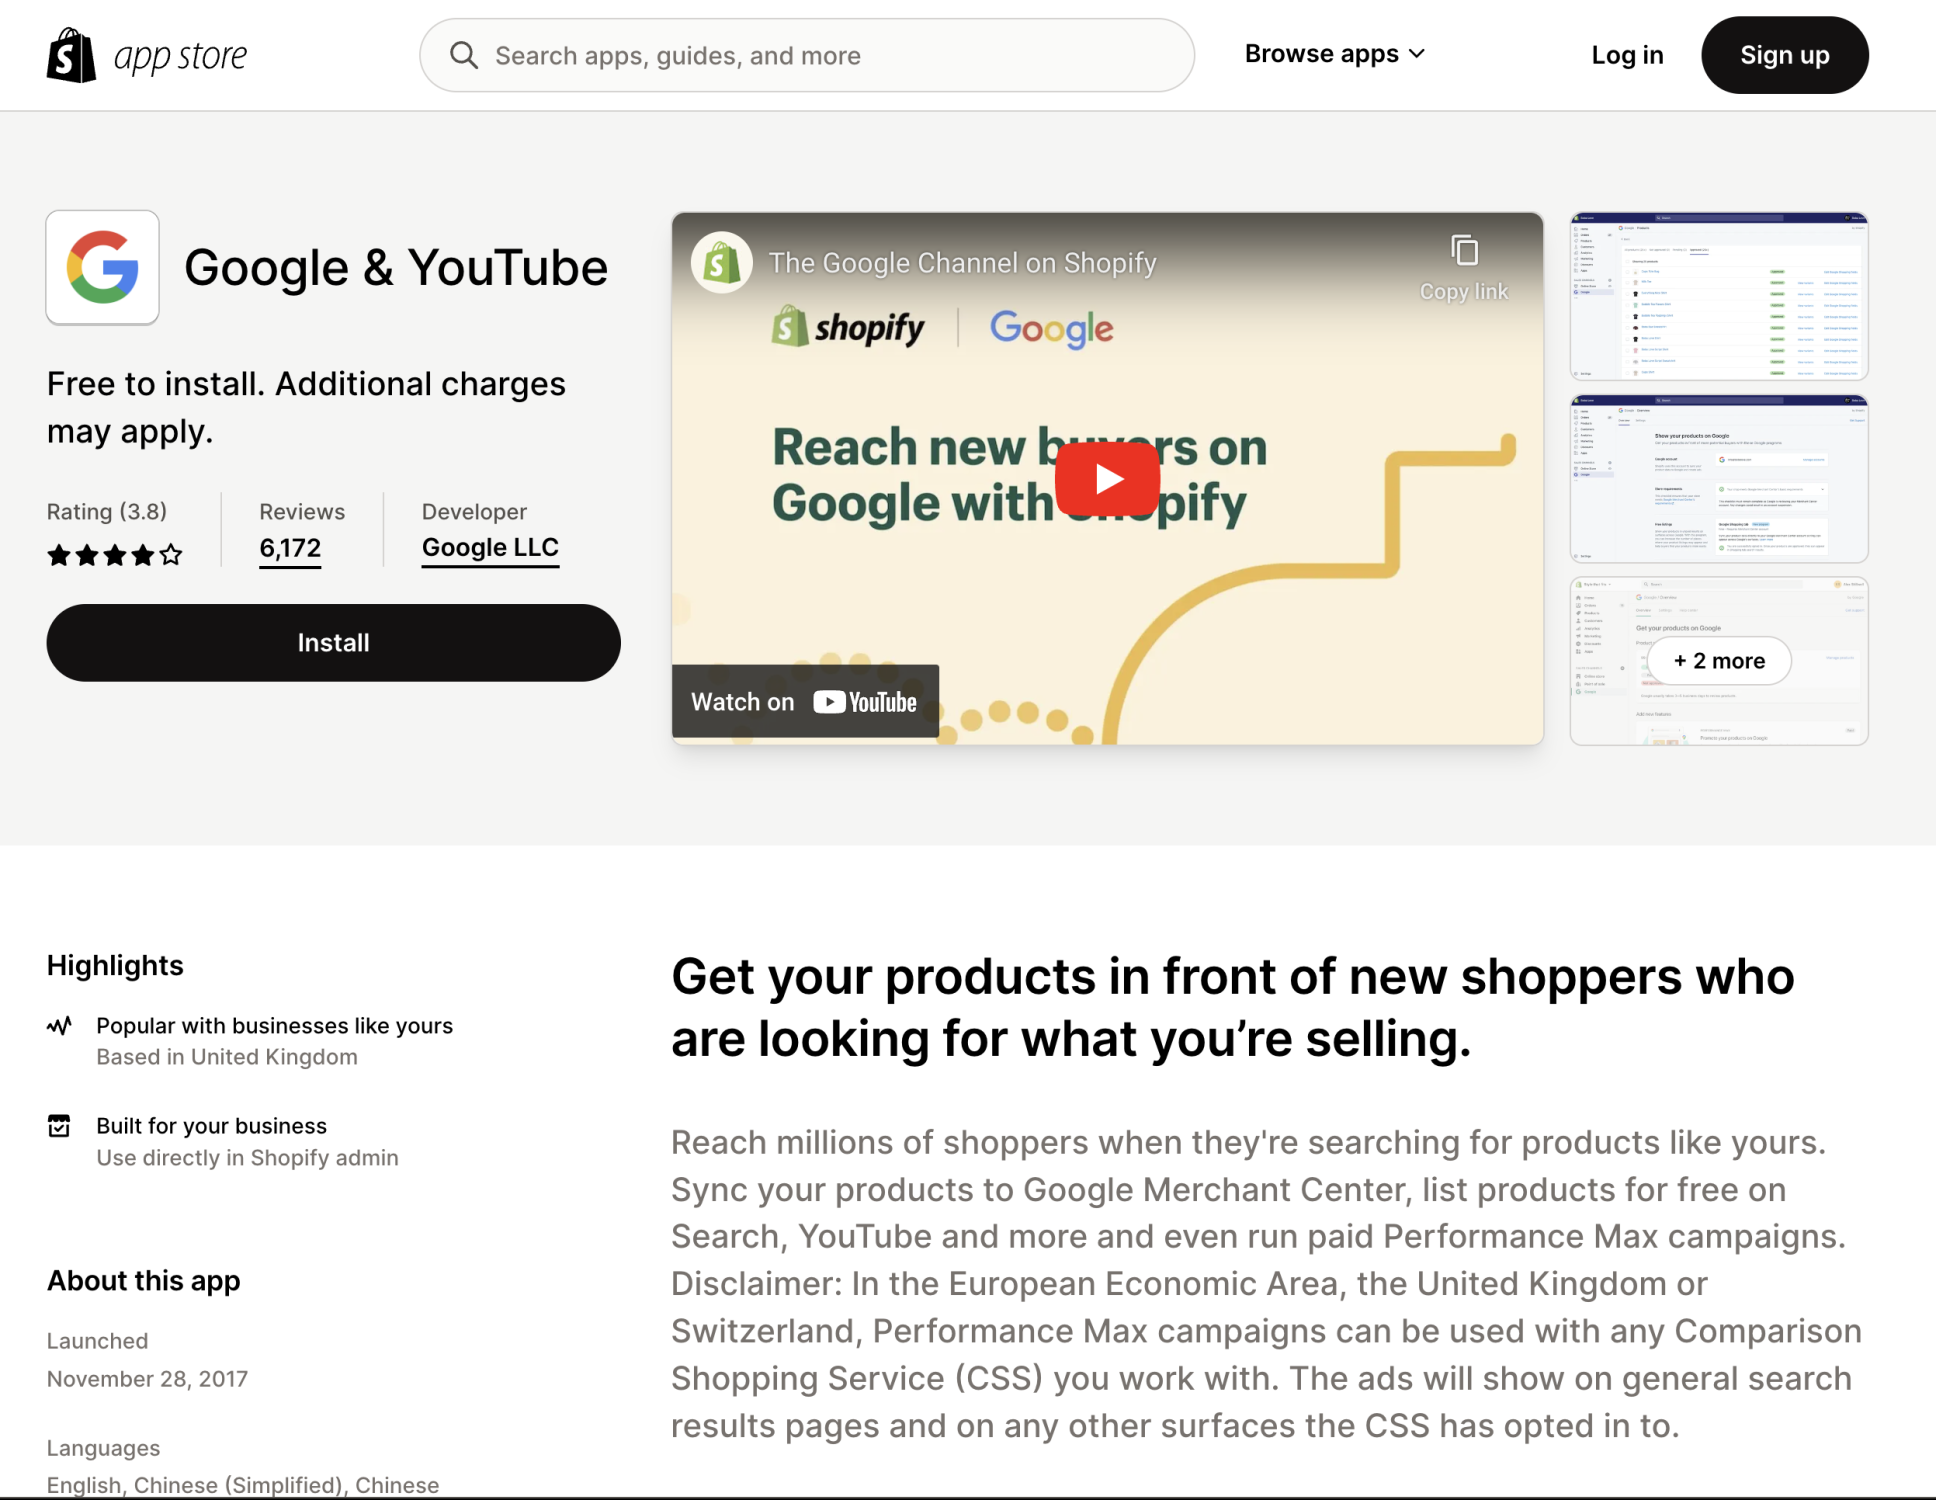
Shopify also offers an app to connect Google Merchant Center to Shopify easily. This integration relies on API connections to sync product data from your Shopify store to Google Merchant Center. The app is called the Shopify Google & YouTube app, formally the "Google Channel App".
Note that the Shopify app doesn't manage the website verification, purely the connection of a product feed to your Google Merchant Center account. This must be carried out per the steps described earlier in this post.
Getting Started With
Performance Max
Download Our Step-by-step guide to getting started with Performance Max Shopping Campaigns for your Shopify Store
GET YOUR FREE EBOOKFREE EBOOK
How To Connect Google Merchant Center With Shopify
Using the app is the simplest way to integrate your Shopify Store with Google Merchant Center and is a fast and easy way to start promoting your Shopify Store with Google Shopping. Ads.
Step 1 - Install the Google Channel App
Log in to your Shopify store, then in the left-hand navigation, click Apps. On the Apps page, click the green Customise your Store button on the top right of the screen.
Search for "Google Shopping Shopify" and find the Google Channel app by Shopify in the Shopify app store. This is the official Google Merchant Center integration app.
Click the Add App button to add this to your Shopify account. You'll be taken to a confirmation page. Scroll to the bottom and click the 'Add sales channel' button.
Step 2 - Connect To Your Google Account
You'll now need to connect Shopify to your Google account, which is done through the Google Sales channel.
You should now find this pinned in the left-hand navigation under Sales Channels. With this selected, you should see a button labelled 'Connect Google account'.
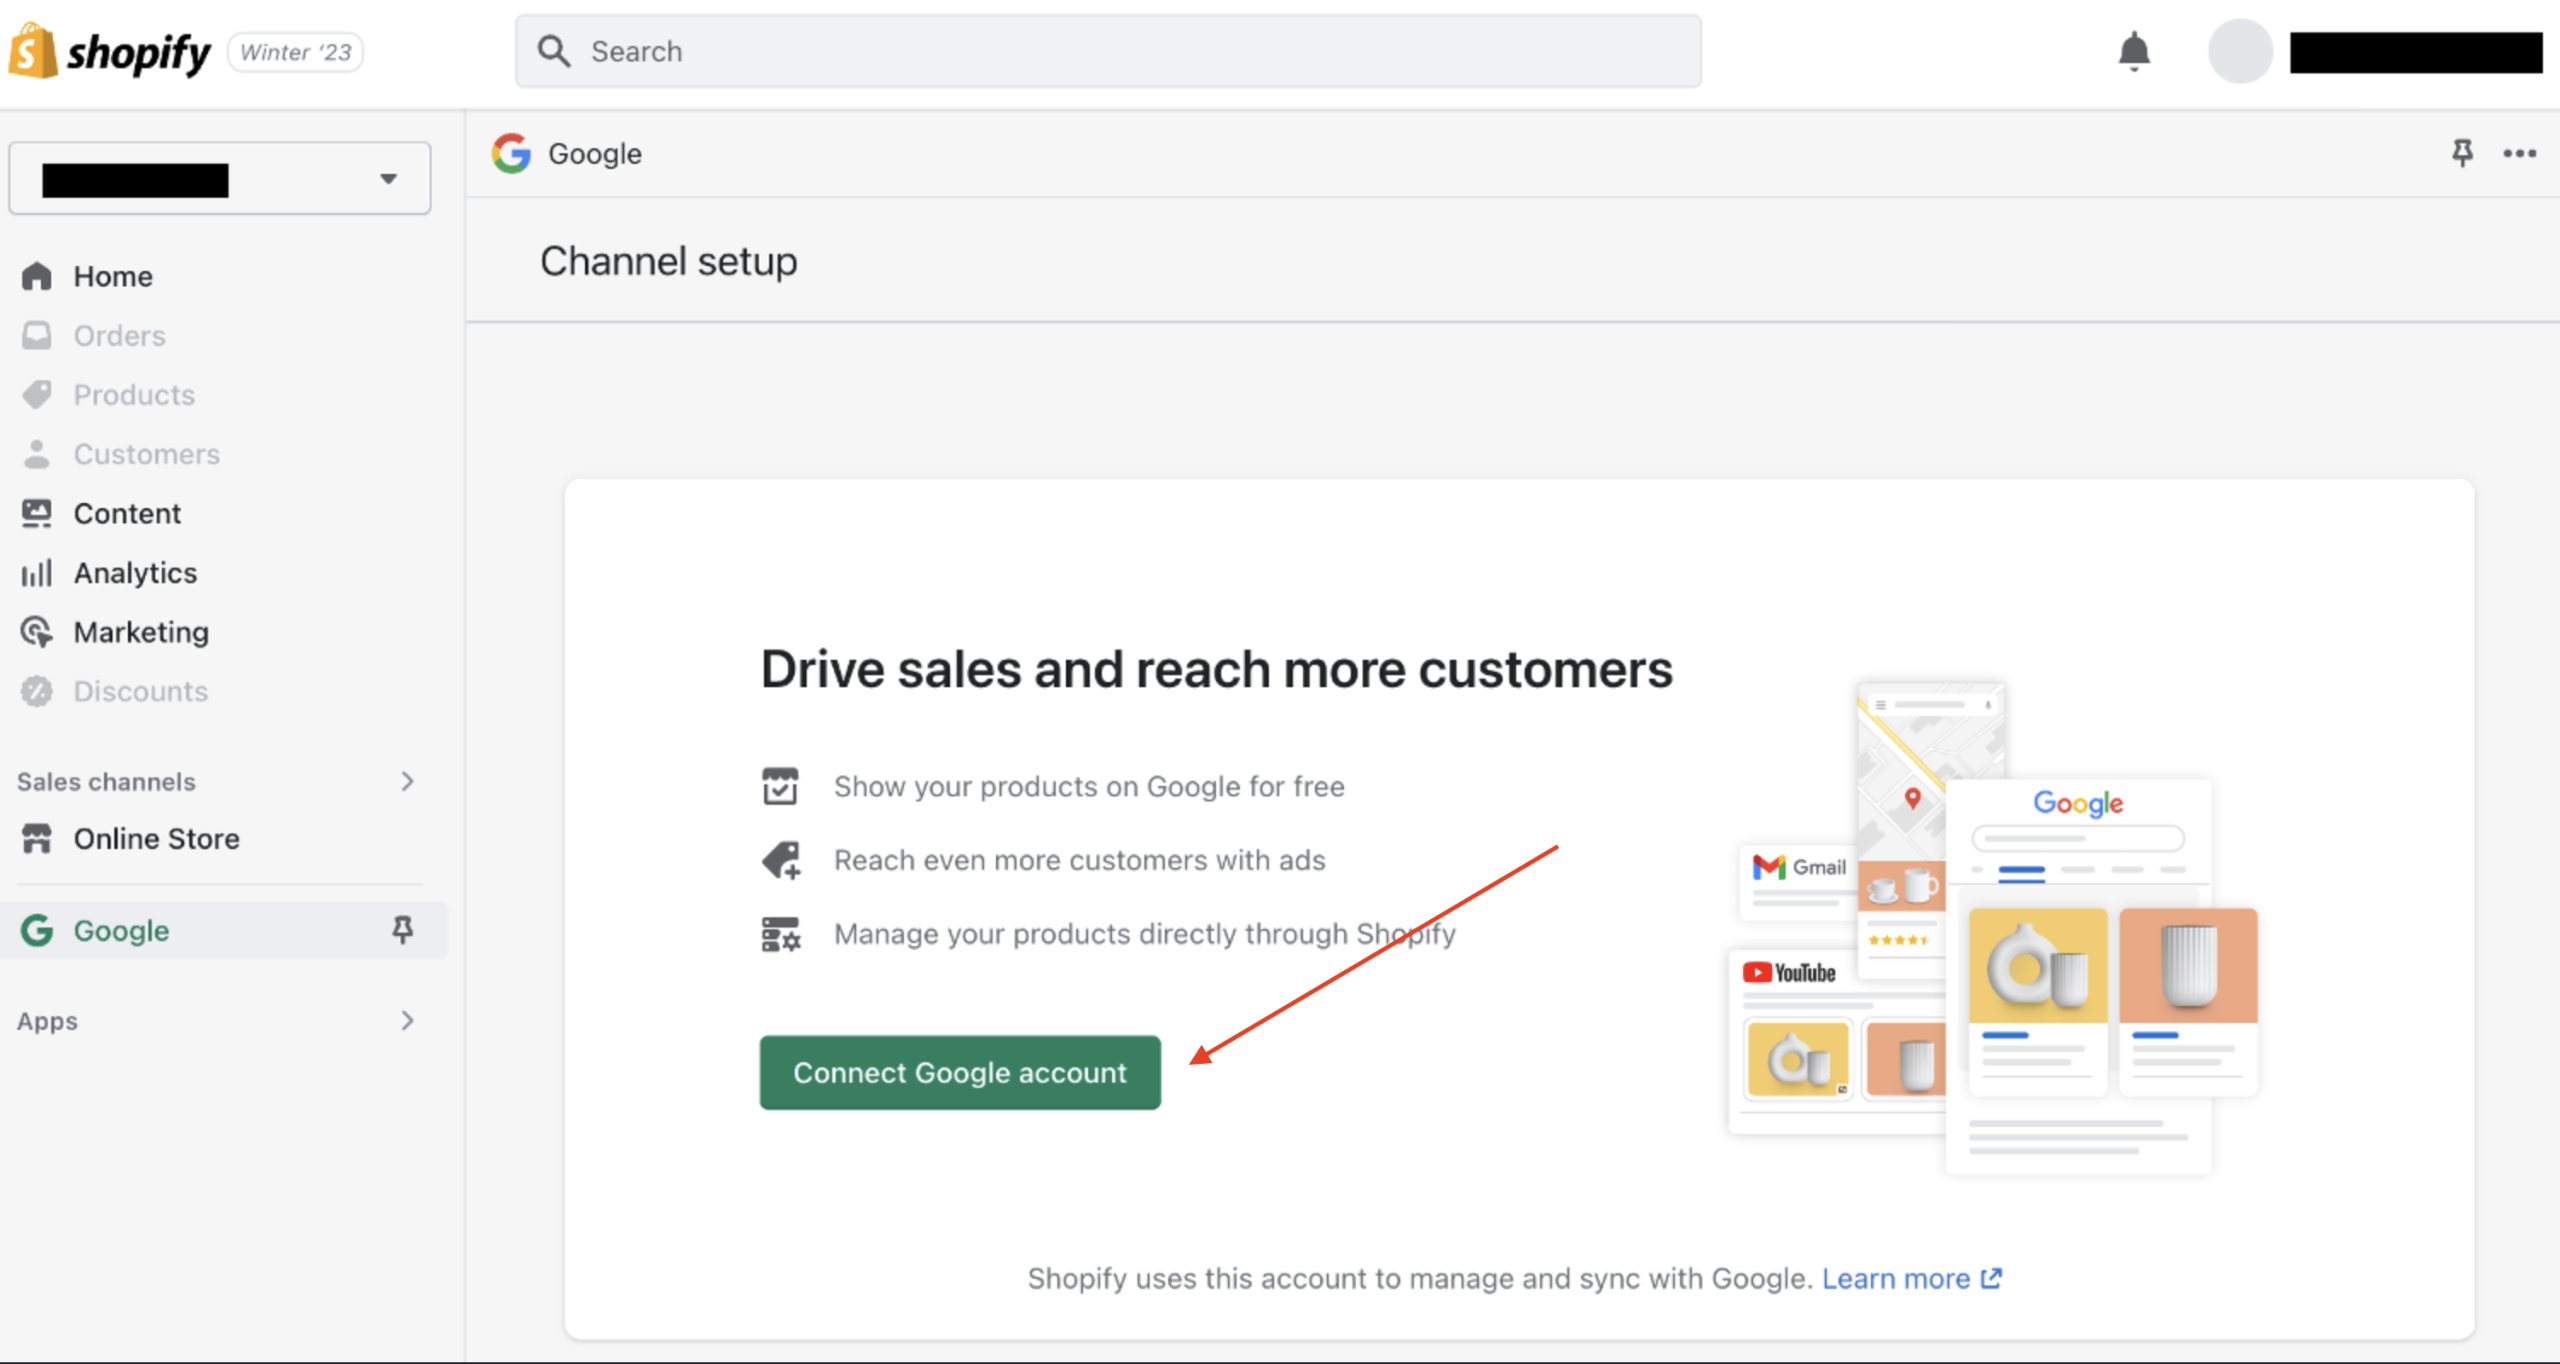
Click Connect Google account, and a prompt will appear asking you to sign into your Google account. Sign in, and on the next page, click Allow to connect the Google sales channel to your Google account.
Sign in with the correct Google account to create your Google Ads and Merchant Center accounts.
Step 3 - Complete The Google Channel Setup
Once your account is connected, you'll see the 'Set up the Google Channel' page. This will have a checklist of requirements needed to serve your products on Google.
Check your Shopify store complies with all of these to avoid disapproval or suspension of your Merchant Center account.
- - Valid payment method
- - Public online store (remove password)
- - Refund policy and terms of service are linked in the footer navigation
- - Up-to-date privacy and cookie policy linked in the footer navigation
- - Contact information added to your online store
Fulfilling these checklist items is crucial to avoid disapproval or suspension of your Merchant Center account.
Once the setup is complete, Google may take 3-5 days to approve the products submitted in your feed. You can proceed with further navigation and optimisation within the Google Merchant Center during this time.
In the following sections, we'll guide you in navigating the Google Merchant Center interface.
Navigating Google Merchant Center
The Merchant Center status dashboard is where you manage your product listings and campaigns. It is divided into several tabs, each offering different tools and insights relating to your Product Listings.
Below, we'll explore each of these tabs and their key features.
Managing Your Product Listings In Merchant Center
The Merchant Center interface is divided into tabs, each offering different information and insights, from basic product information to diagnostics and performance insights.
The Overview Tab
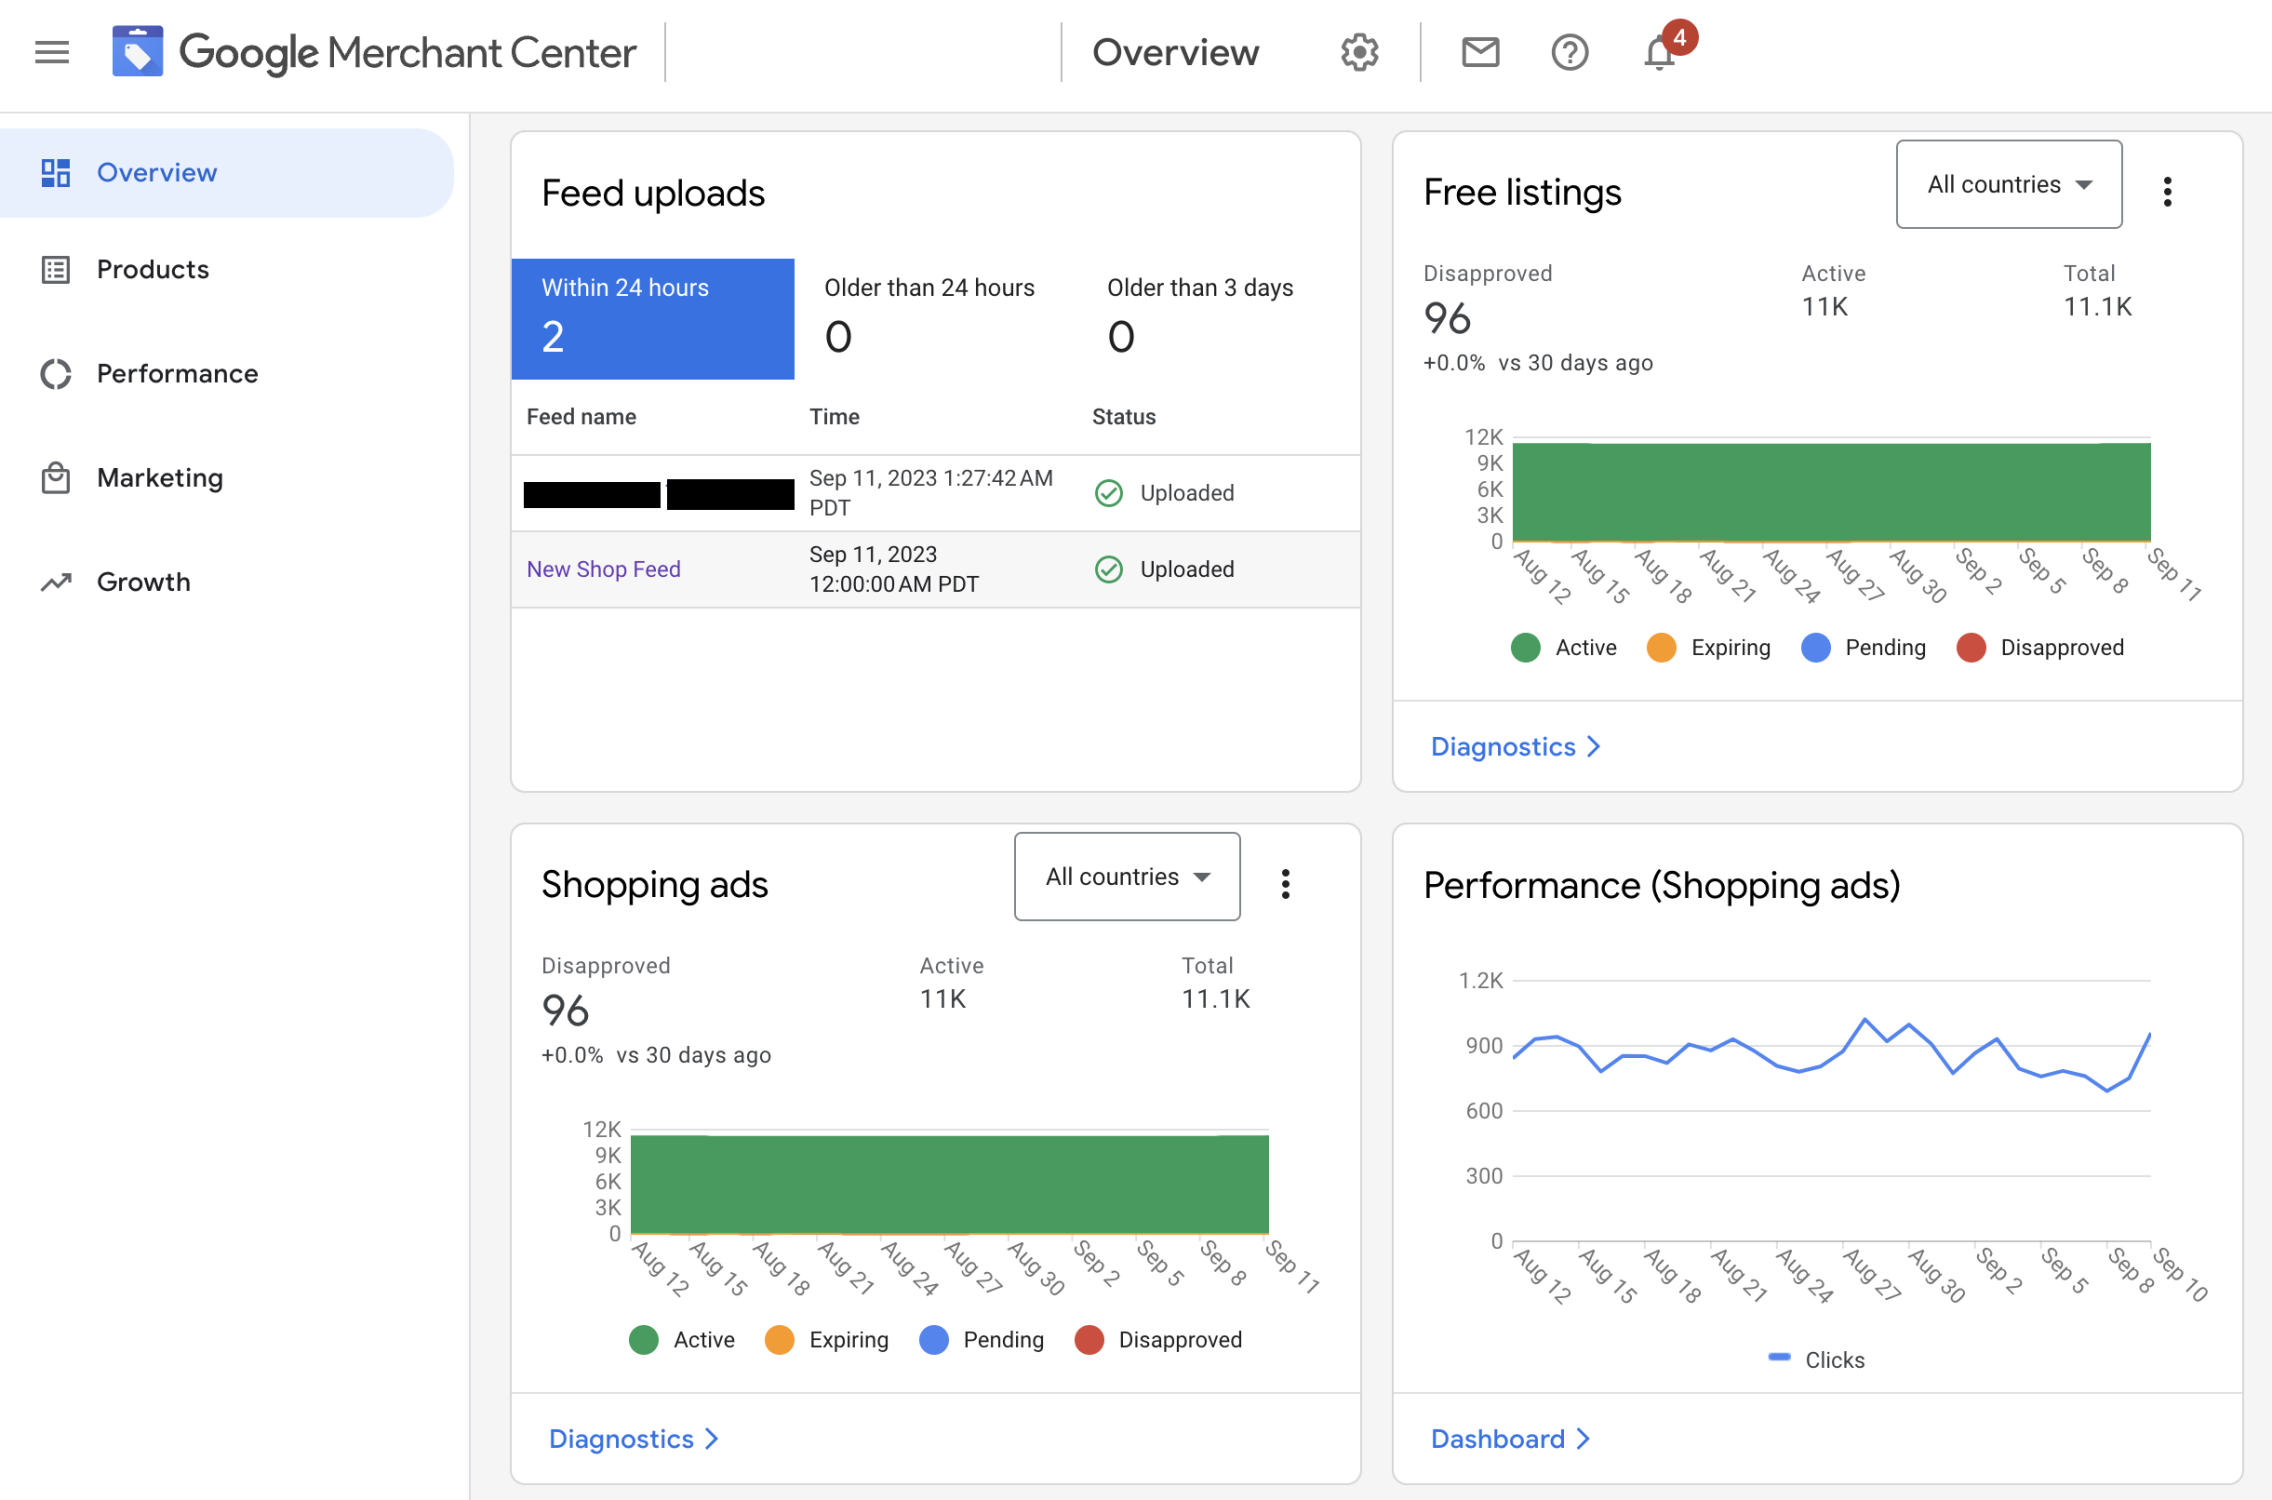
The Overview Tab provides a snapshot of your Merchant Center account's health and performance. Key information cards on this tab include:
- Feed Uploads: Displays master feeds that upload product information to your Merchant Center account, including upload times and status.
- Free Listings: Offers a historic diagnostic overview of your product count in free listings, showing the total, active, and disapproved products. It can be filtered by country to identify policy issues affecting product visibility in specific locations.
- Shopping Ads: Similar to Free Listings but specific to paid Product Listing Ads, providing an overview of active and disapproved products.
- Performance (Shopping Ads): Displays a historical trend of clicks on your ads, with a direct link to the Performance Dashboard.
- Performance (Free Listings): This shows a historical trend of clicks on your free product listings, with a direct link to the performance dashboard.
- Announcements: Highlights any announcements by Google related to Product Listings.
Products Tab
The Products Tab lets you access your product information and update feed settings. It breaks down into three sub-tabs:
Products > Diagnostics
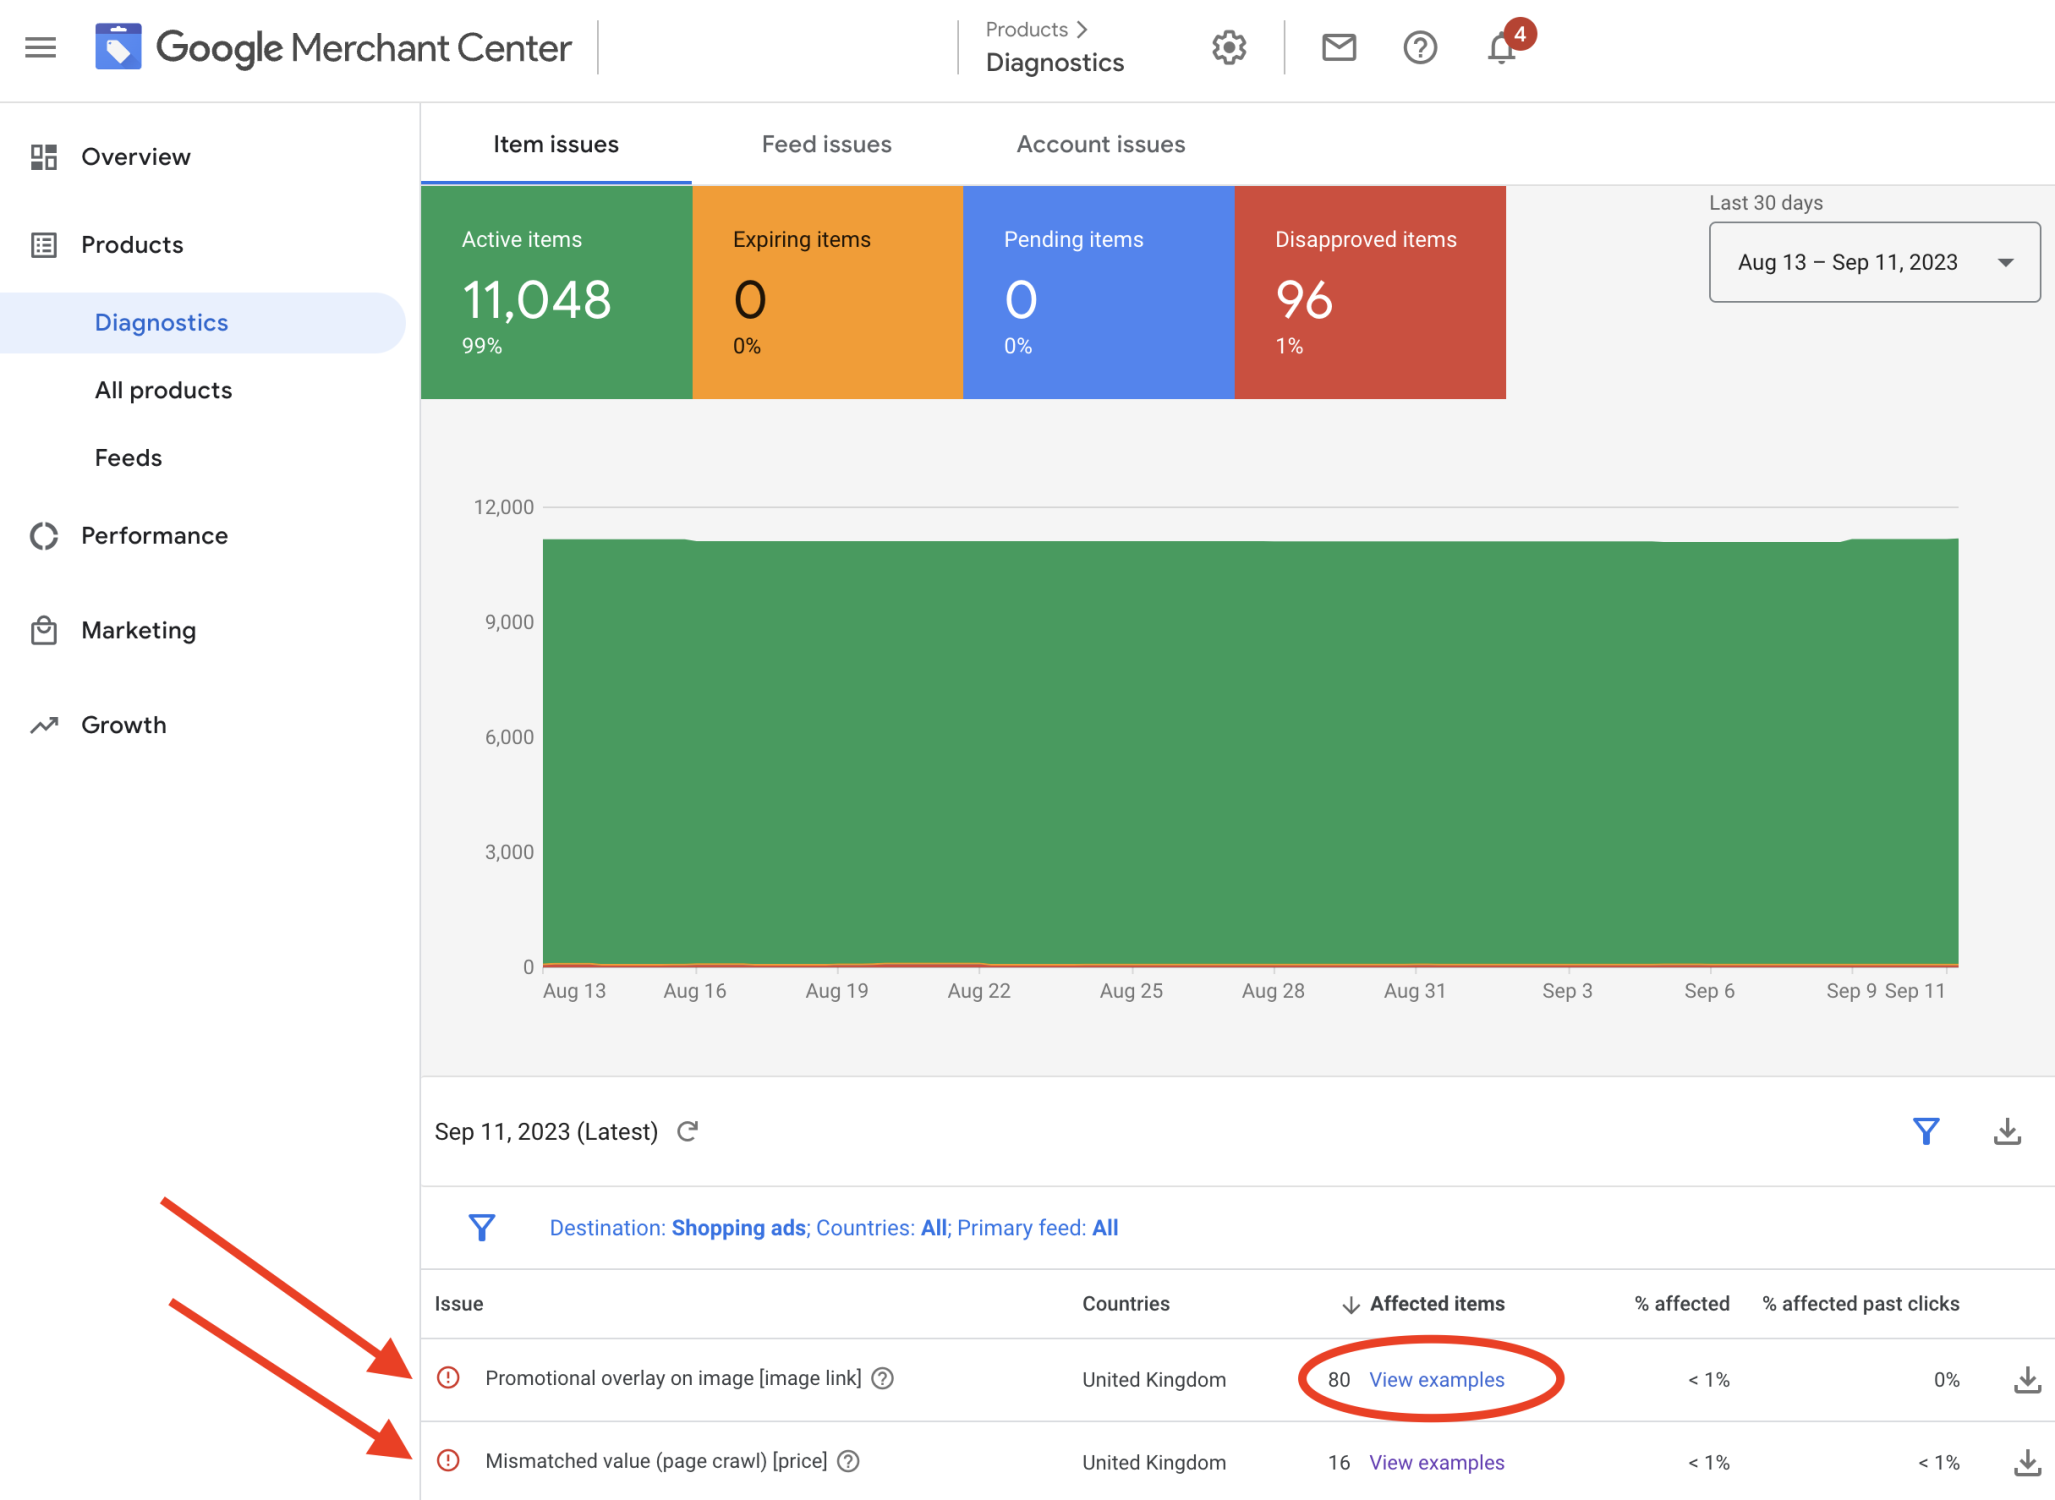
This sub-tab highlights diagnostics, visually representing historical counts for Active, Expiring, Pending, and Disapproved items. Products with issues are highlighted below, offering detailed reasons for disapprovals and warnings. A hyperlink next to each will show you a sample list of items with the noted problems.
Products > All Products Tab
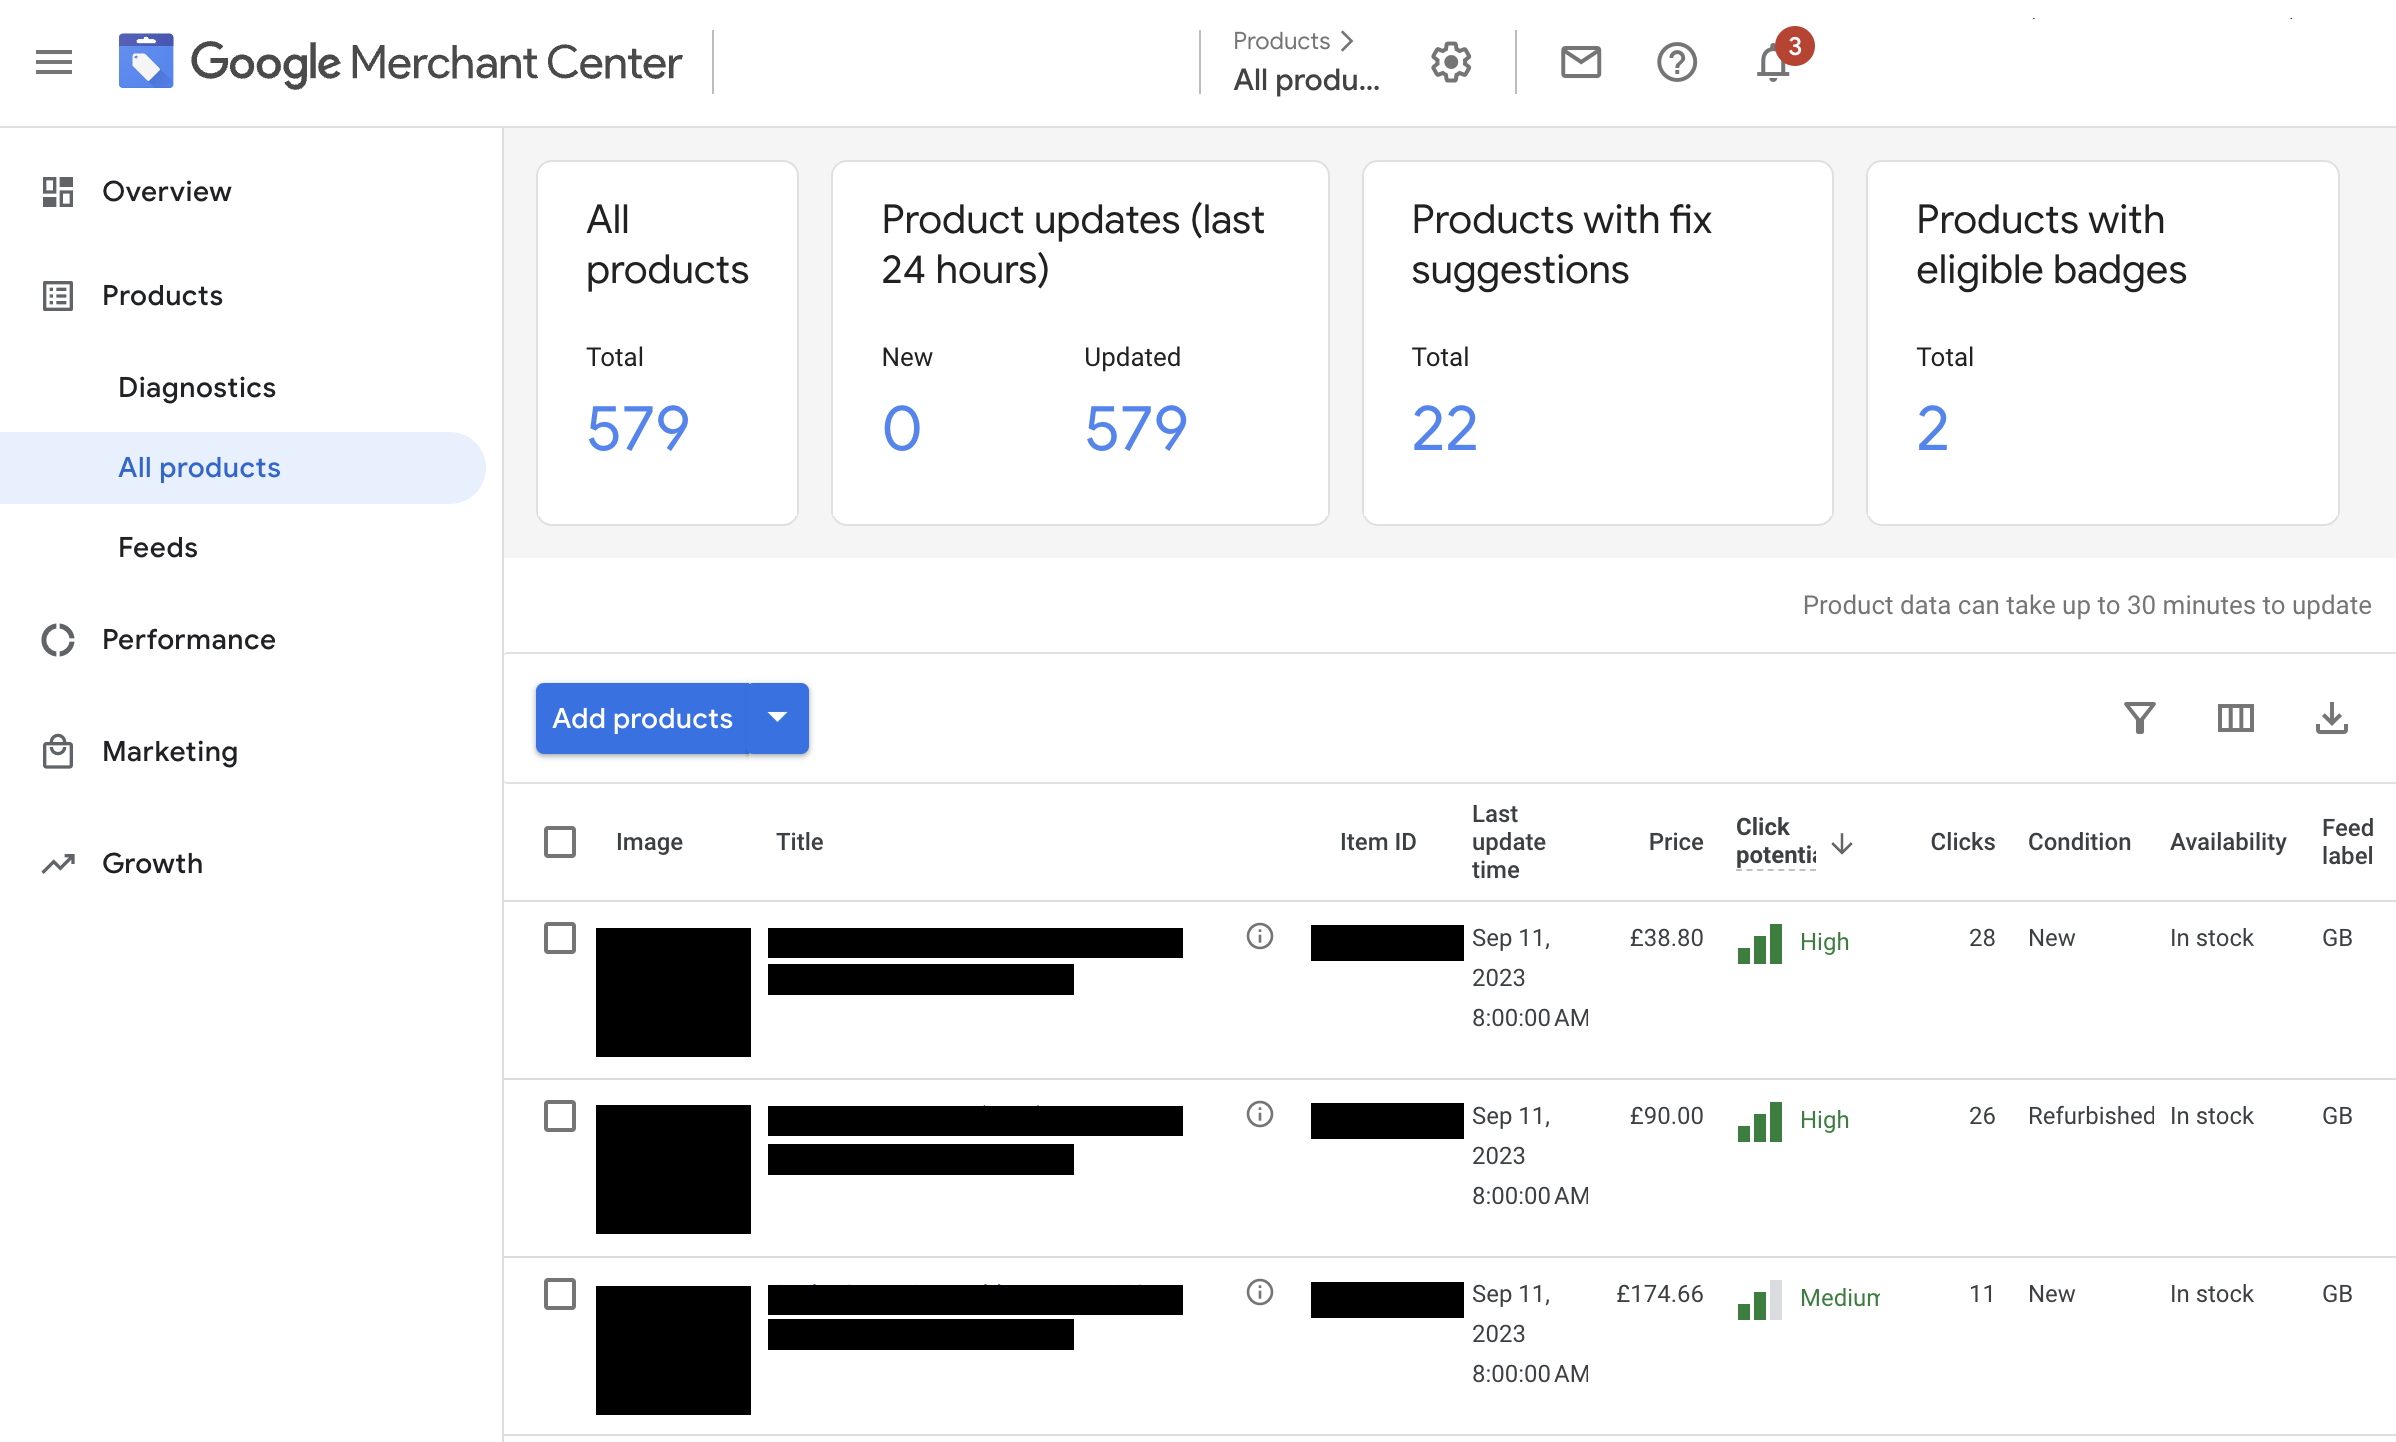
The All Products tab lists all the products uploaded to your Merchant Center account, with details such as title, item ID, last update time, price, availability, and image.
Performance metrics like clicks and click potential are also shown.
Diagnostic information can also be viewed at the product level.
Products > Feeds Tab
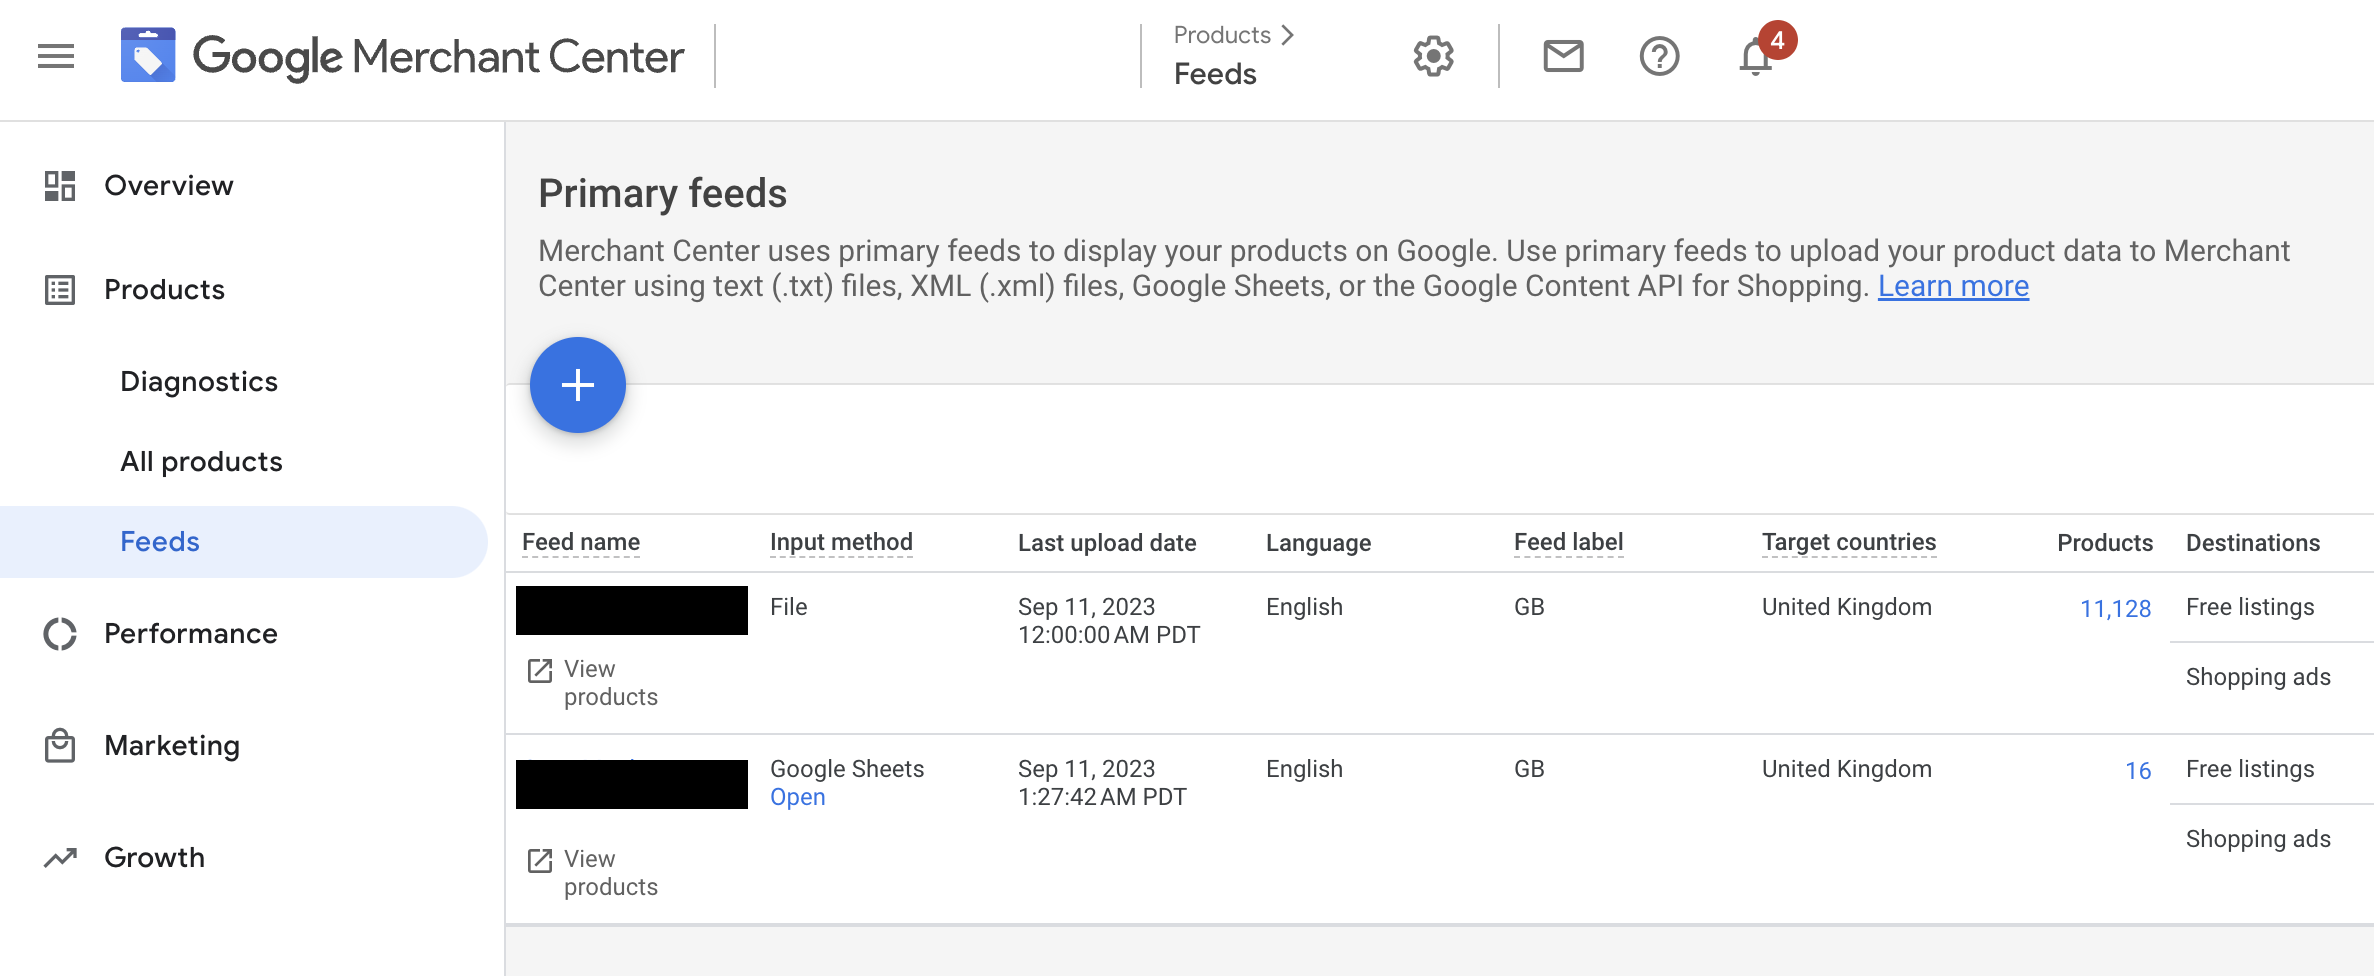
The Feeds Tab lists the product feeds connected to your Merchant Center account. Clicking on each feed takes you to a detailed page where you can adjust settings specific to each feed, including application to free product listings and Google Shopping, feed name, fetch schedule, and rules which can be applied to modify product data.
Performance Tab
The Performance Tab offers performance insights for your product listings, including clicks from free (organic) and paid product listings. It's represented by a graph that visualises trends over time.
The performance tab breaks down into the following sub-tabs;
Performance > Dashboard
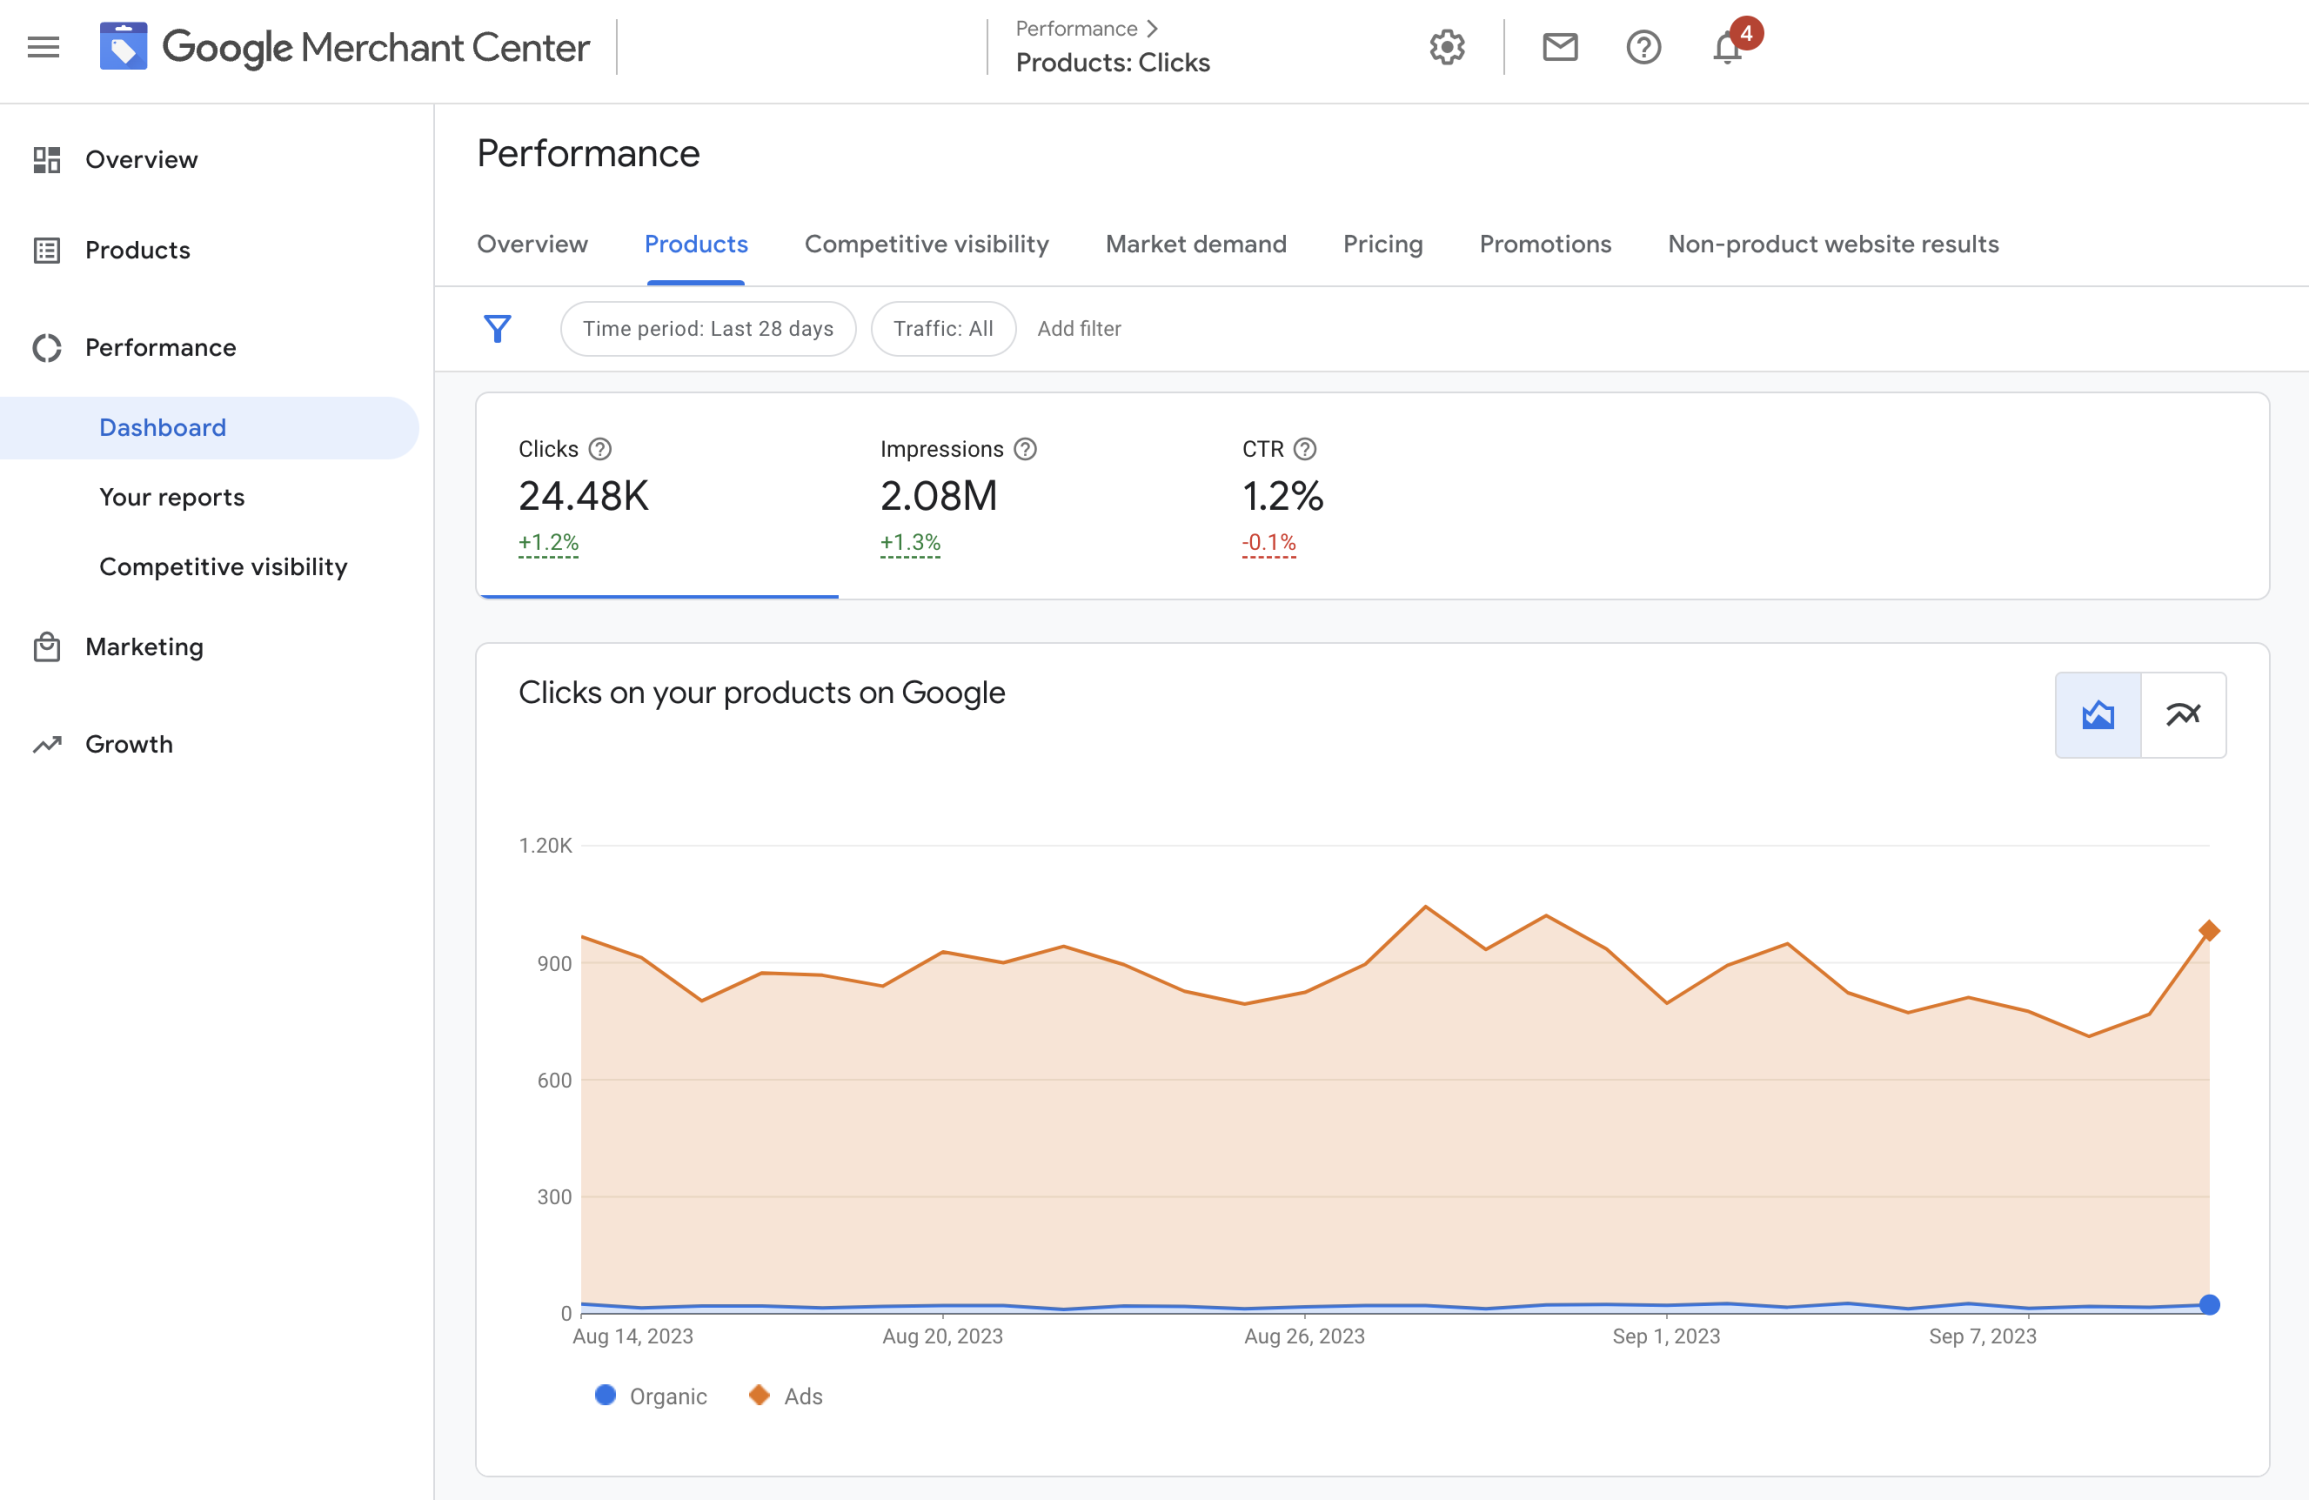
This sub-tab shows clicks specific to product listings, separated into organic and paid listings. It includes cards highlighting popular products, trending products, and brands.
Performance > Competitive Visibility
This tab highlights competitors with product listings in the same space. It compares products and shared audiences, providing insights into relative visibility trends and businesses with the highest visibility on Google.
Performance > Market Demand
This tab offers insights into popular products, out-of-stock opportunities, and trending brands. It helps you identify high-demand products and categories and discover new ideas for your inventory.
Performance > Pricing
If available, this tab provides insights on how your product pricing compares with competitors, highlighting price gaps.
Performance > Promotions
This is where you can view and manage promotions in the Merchant Center. Promotions, such as discounts, are applied through discount codes on your website.
You can track performance metrics for each promotion, including impressions, clicks, and click-through rates.
Performance > Non-product Website Results
This tab tracks traffic from Google to pages on your website that are not product detail pages. Monitoring non-product website results allows you to improve these pages and enhance your website's overall performance.
Marketing Tab
The Marketing Tab is where you manage marketing campaigns and promotions applied in the Merchant Center and campaign data from your Google Ads account.
Marketing > Promotions Tab
This tab manages promotions, such as discounts or free shipping, applied through discount codes on your website. You can specify product groups, categories, and promotion order value thresholds.
When a promotion is applied, this can be seen by customers looking at your product listings in ads and free listings.
Marketing > Ad Campaigns
This tab pulls data from your Google Ads campaigns to report on ad clicks, conversions, costs, and cost per conversion. It lists each campaign driving Product Listing Ad traffic, with traffic and cost metrics pulled from your Google Ads account.
Growth Tab
The Growth Tab comprises five sub-tabs, each offering insights and opportunities for improving your business.
Growth > Opportunities
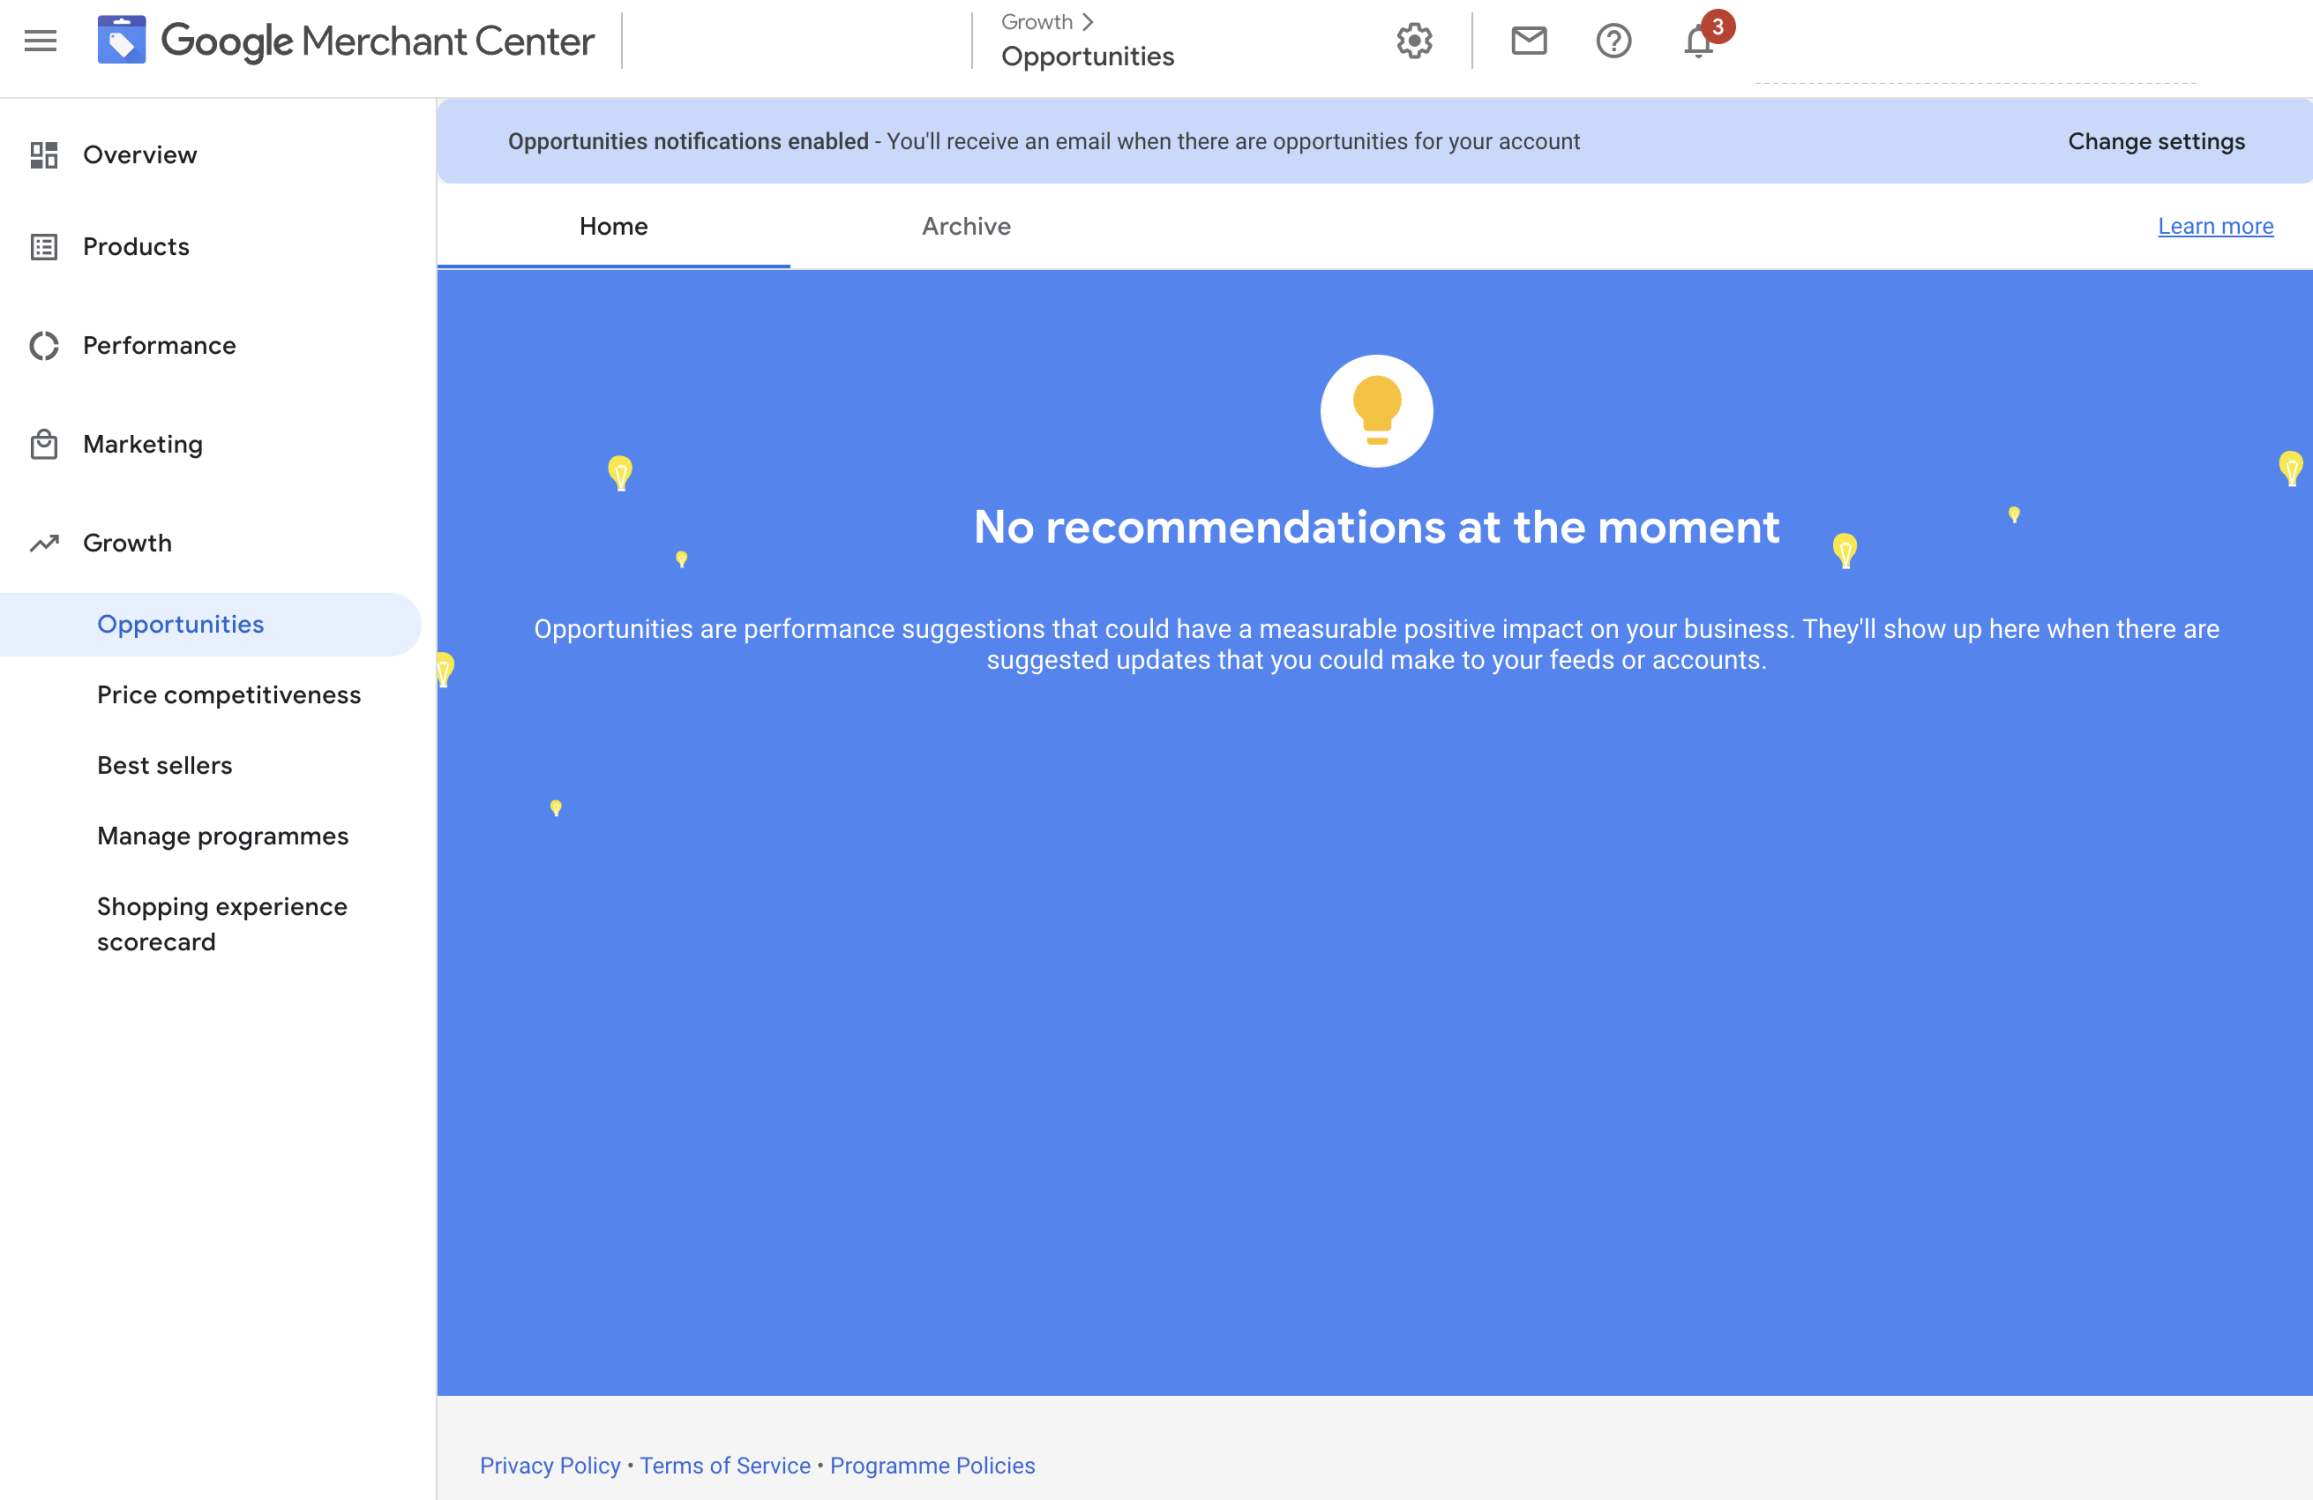
Google highlights performance suggestions that can have a measurable positive impact on your business. These suggestions appear here and offer guidance on updates to feeds or accounts.
Growth > Price Competitiveness
This tab highlights how competitors price the same products you sell and which products could benefit from a price change based on benchmark prices.
Growth > Best Sellers
This sub-tab shows top products and brands on Shopping ads and free listings. It ranks products and brands based on the estimated number of products sold.
Growth > Manage Programs
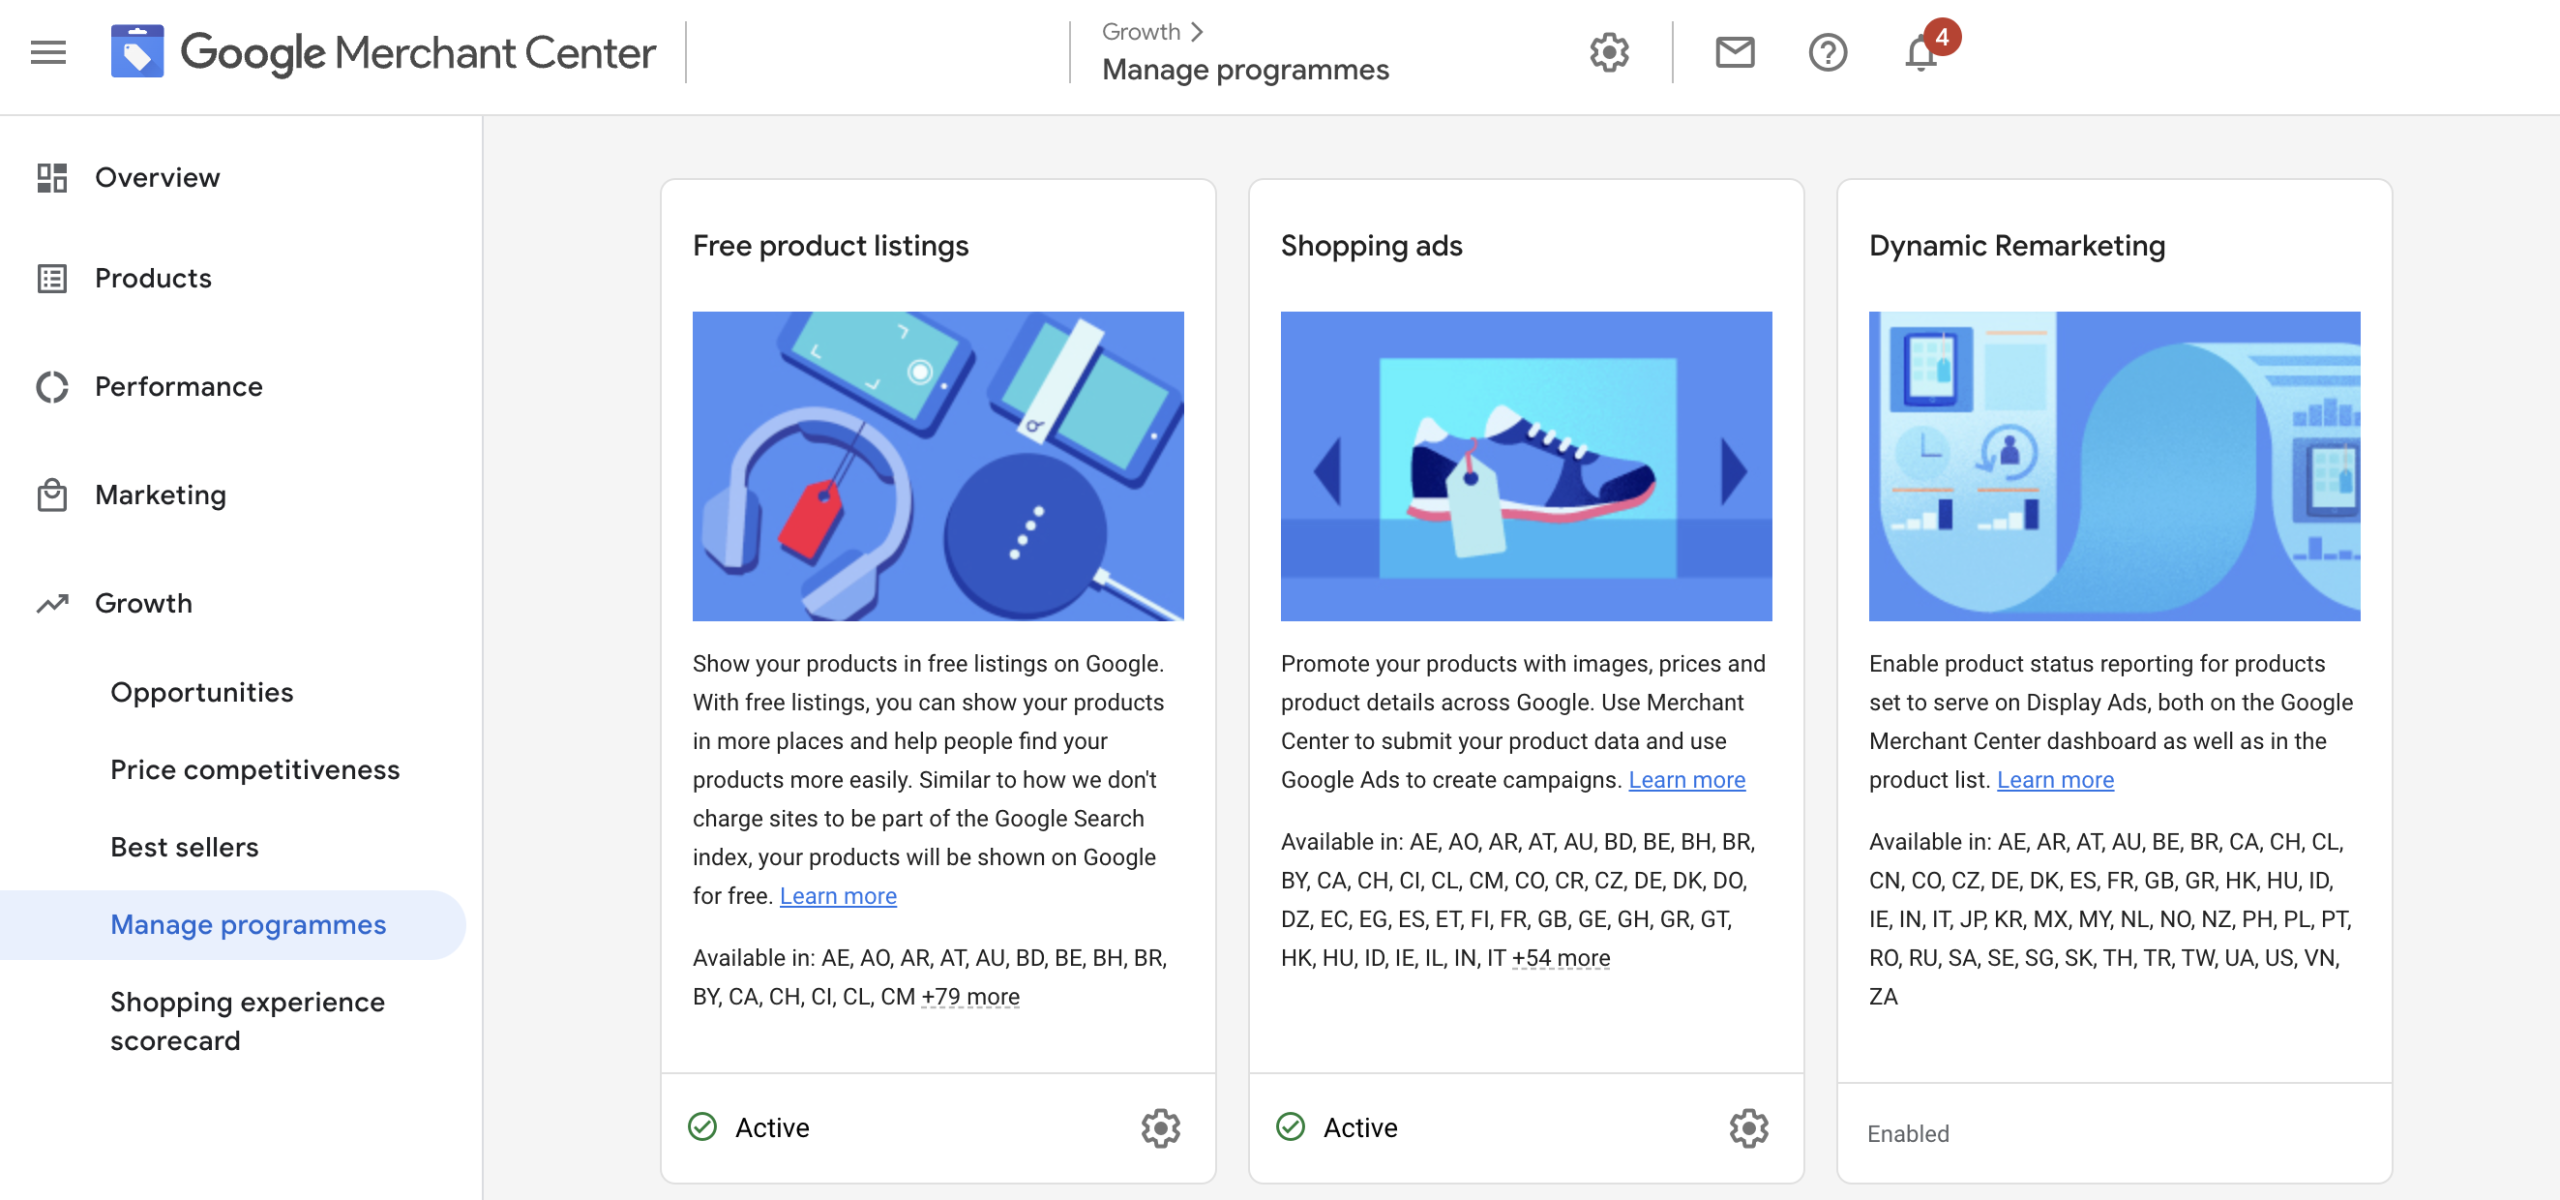
Here, you can manage integrations by connecting your Google Ads account for Shopping ads and enabling dynamic remarketing. You can also allow other services like customer ratings and product reviews.
Growth > Shopping Experience Scorecard
This tab compares your store to competitors in the United States, considering factors like delivery cost, delivery time, and returns experience. A high score can lead to a Top Quality Store Badge that improves consumer confidence.
The scorecard offers recommendations for improving your store's experience score.
This completes the navigation of the Google Merchant Center interface, helping you understand its various tabs and features to manage your product listings and campaigns effectively.
Google Merchant Center Policies and Guidelines Overview
Google Merchant Center enforces strict policies and guidelines to ensure users a safe and positive shopping experience. Violating these policies can lead to account suspension or removal from Google Shopping.
Here, we overview some of these policies, highlight prohibited products and practices, and offer guidance on avoiding account suspension.
Policies and Guidelines
1. Data Quality
- Accurate Product Information: Ensure that your product data, including titles, descriptions, prices, and images, accurately represent the products you sell. Misleading information is not allowed.
- Up-to-date Information: Keep your product data current. Update prices, availability, and other relevant details regularly and ensure this reflects what is published on your website.
- Unique Identifiers: Use unique product identifiers like GTINs (Global Trade Item Numbers) whenever possible to improve product matching.
2. Prohibited Content
- Restricted Products: Some products, such as illegal, dangerous, or offensive items, are not allowed on Google Shopping. Review Google's policies to identify Google Shopping Unsupported Content.
- Copyrighted Material: Only list copyrighted material with proper authorisation.
- Adult Content: Adult products, content, or services must comply with Google's Adult content policy and applicable laws. Due to Google policies, some products may only have limited reach in some locations.
3. Shopping Ads Policies
- Transparency: Ensure transparency in your advertising. Display transparent pricing, shipping information, and return policies.
- Counterfeit Goods: Do not sell counterfeit products or engage in deceptive practices in your ad content.
- Prohibited Practices: Avoid bait-and-switch, misleading promotions, or clickbait tactics. This will get your account suspended.
Website Policies
- User-Friendly Experience: Provide a user-friendly and secure online shopping experience. Ensure that your website loads quickly, is mobile-friendly and that your sales, shipping and returns policies are easily accessible and transparent.
- Payment Processing: Offer secure payment processing and handle customer data responsibly.
Shipping and Returns
- Delivery Times: Communicate expected delivery times to customers by adding details to your Merchant Center account and website.
- Return Policy: A transparent and fair return policy must meet legal requirements.
Prohibited Products and Practices
Google prohibits the sale of specific products and practices, including but not limited to:
- Illegal or Regulated Products: Drugs, weapons, and products violating local laws or regulations.
- Counterfeit Goods: Selling fake or imitation products is strictly prohibited.
- Deceptive Practices: False advertising, price gouging, or misleading claims are prohibited.
- Hateful Content: Content promoting hate speech, discrimination, or violence is prohibited.
- Adult Content: Adult products must adhere to specific policies and restrictions.
Troubleshooting Google Merchant Center Errors
Account disapproval or errors in Google Merchant Center can be frustrating, but they are often manageable with the right approach. Here, we discuss common issues that can lead to account disapproval, offer practical solutions and troubleshooting tips, and address the challenges of vague reasons for account disapproval.
Common Issues Leading to Merchant Center Disapproval
- Data Feed Errors: Your product data feed is the backbone of your Merchant Center account. Errors in the feed, such as missing required attributes, incorrect formatting, or broken URLs, can lead to disapproval.
- Policy Violations: Violating Google's policies, including prohibited content or deceptive practices, can result in account disapproval.
- Misleading Information: Providing inaccurate or misleading product information, including incorrect prices, descriptions, or images, can lead to disapproval.
- Website Issues: Problems with your website, such as slow loading times, broken links, or poor mobile optimisation, can trigger disapproval.
- Insufficient Data: Inadequate or incomplete product data, including missing product identifiers like GTINs, can lead to disapproval.
- Quality of Images: Low-quality or distorted product images can result in disapproval.
- Policy Changes: Failure to adapt to policy changes or updates in Google's guidelines can lead to disapproval.
These common issues may lead to your products being disapproved in Merchant Center. For a comprehensive guide, check out our dedicated guide to Mastering Google Merchant Center: Fixing Common Product & Feed Errors.
Google Merchant Center Suspension
Account suspension in Google Merchant Center is a serious matter that can have significant consequences for your advertising efforts and free product listings. The specific steps for resolution may vary depending on the nature of the policy violation. It's crucial to act promptly, address the root causes, and maintain a commitment to compliance to prevent future account suspensions.
For a more in-depth discussion on common reasons for Google Merchant Center suspension, including issues related to "Google Merchant Center Suspended Misrepresentation," you can refer to our dedicated post, Google Merchant Center Suspension: What You Need To Know.
Google Merchant Center Optimisation Tips
Optimising your product data feed is essential for maximising the performance of your Google Merchant Center account. This section will provide best practices for optimising your product data feed, highlight common errors, and explain how to troubleshoot issues using Google Merchant Center diagnostics.
Best Practices for Product Data Feed Optimisation
- Optimise Product Attributes: Think about what information potential customers would like to know about a specific product. Include attributes like "age range," "size," "material," and more. Incorporate important attributes directly into the product titles and descriptions to improve visibility when customers search for specific details.
- Keep Your Feed Tidy: Organise your data feed in a way that allows for scalability without issues. Please clean up your data feed before importing it into Google Merchant Center to minimise errors and save time.
- Add GTINs & MPNs: Specify GTINs (Global Trade Item Numbers) for all products in Google Shopping. If GTINs are unavailable, mark the 'identifier_exists' field as TRUE to indicate their existence.
In this post, we've just skimmed the surface of optimising product data feeds, but for a more detailed guide, check out our Guide To Google Shopping Product Feed Optimisation for e-commerce.
Where To Focus Your Merchant Center Optimisation Efforts
There is a lot of data to optimise in your product feed, and though it can be overwhelming, it also offers lots of opportunities. Here are some areas we suggest you initially focus on, as these can have the most significant impact and perhaps the lowest-hanging fruits in your traffic acquisition efforts.
- Product Title: Ensure it's relevant, concise, and contains only necessary information about the product.
- Product Image: Use high-quality images that showcase your product attractively.
- Product Description: Provide additional relevant details about the product, emphasising key attributes near the beginning.
- Product Category: Choose the most specific and relevant category from the Google Product Taxonomy.
- Product Type: Create your categorisation system using the [product_type] attribute.
- Other Attributes: Depending on your product, include age group, gender, colour, size, and price for better targeting.
Automatic Item Improvements in Google Merchant Center
Google Merchant Center has introduced a powerful new feature called Automatic Improvements. This feature is designed to enhance the accuracy and relevance of your product data by automatically detecting and resolving discrepancies between your data feed and the information Google finds when it crawls your product landing pages.
How Automatic Item Improvements Work
Automatic item updates leverage your product data feed and the information on your product landing pages to identify and rectify discrepancies in crucial attributes. These attributes primarily include:
- Price: Automatic updates ensure that the price displayed in your ads or free listings aligns with your product landing page price.
- Availability: It checks the availability status of products and updates it to reflect the current status on your landing page.
- Condition: The feature also monitors and updates the condition attribute based on the information found on your landing page.
To illustrate, consider this scenario: Your data feed indicates a product price of $4, but your product's landing page lists it at $3. Automatic item updates will detect this inconsistency and adjust the price to $3 to match the landing page.
Benefits of Automatic Item Updates
The introduction of automatic item updates offers several significant advantages:
- 1. Enhanced Data Accuracy: Automatic item updates help maintain the accuracy of your product data by aligning it with the information on your landing pages. This ensures that customers see your products' correct price, availability, and condition, reducing the chances of data-related errors.
- 2. Improved User Experience: When customers encounter accurate and up-to-date product information in your ads or free listings, it enhances their shopping experience. They can make more informed decisions, leading to higher customer satisfaction.
- 3. Increased Traffic and Conversions: The feature increases traffic and conversion rates. Customers will trust accurate product details and are more likely to engage with your listings and complete purchases. Fewer product errors will mean maximum up-time for your product listing ads so that you won't miss any traffic and sale opportunities.
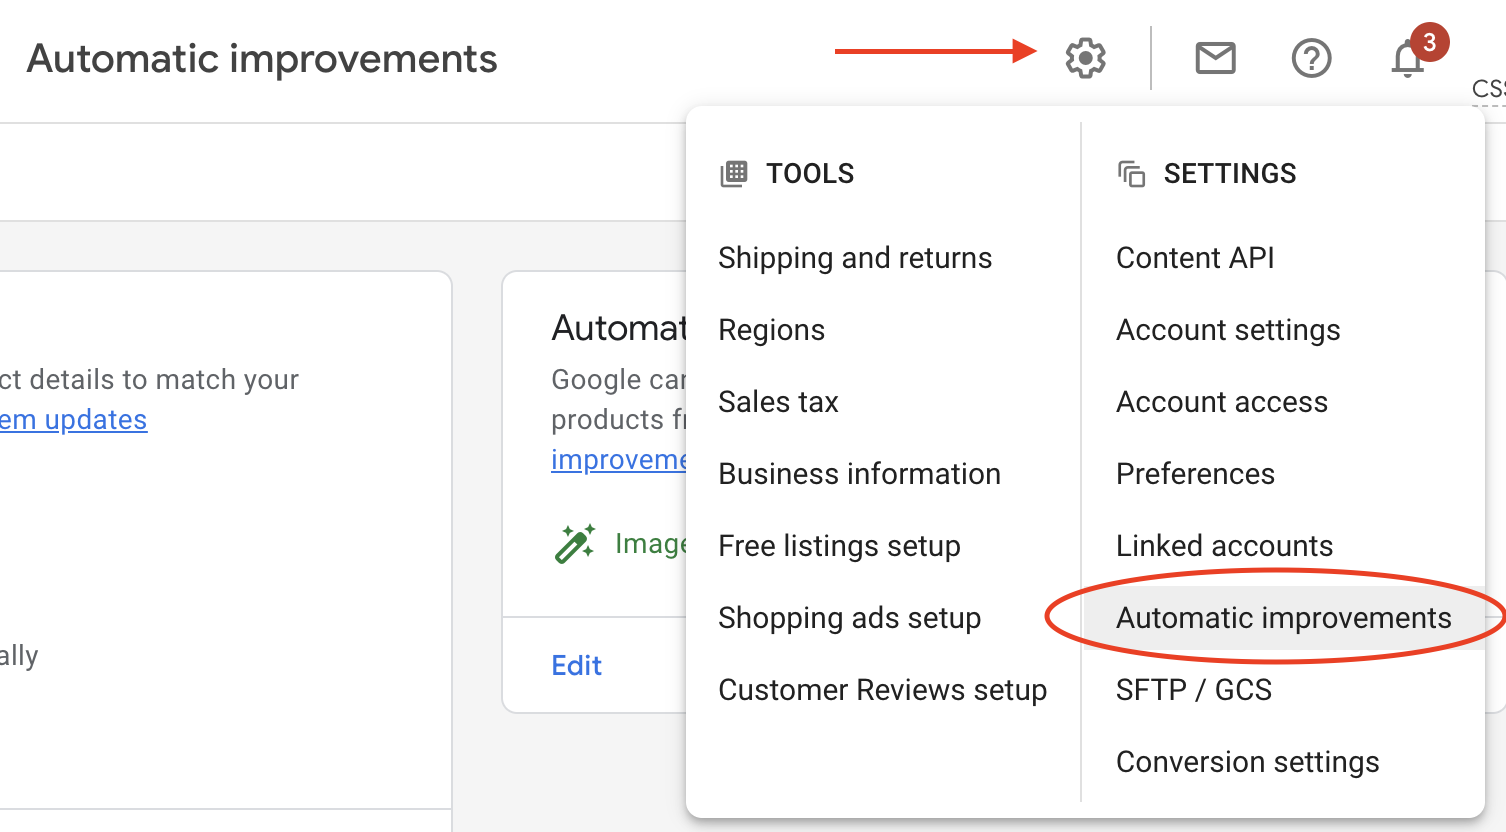
How To Turn On Automatic Product Updates In Merchant Center
To benefit from Automatic Updates, you must ensure the features are turned on in your Merchant Center account. To access these settings, go to the "Tools & Settings" menu via the gear icon at the top right corner of your Merchant Center interface and click "Automatic improvements" in the menu.
In conclusion, Automatic Item Updates are valuable to your feed optimisation toolkit. They empower you to maintain accurate product information, improve the user experience, and boost traffic. By leveraging this feature, you can ensure that your product data aligns seamlessly with your websites' landing pages, providing customers with the most relevant and up-to-date information.
Google Merchant Center and Analytics
Google Merchant Center offers easy integration with Google Analytics 4 (GA4). This will provide you with an improved view of traffic and sales acquired through your free product listings by connecting your Merchant Center and GA4 property.
Insights like user behaviour, engagement and sales data from the free listings will be visible. In addition, you can then compare traffic and free listing for individual products.
How to track Google Merchant Center performance with Google Analytics
Before you start, you will need admin access. If you have admin access, you are good to go.
First, you'll need to enable auto-tagging in Google Merchant Center.
What is Auto-tagging? Auto-tagging is a functionality that enables you to employ third-party tracking tools such as Google Analytics for monitoring website traffic.
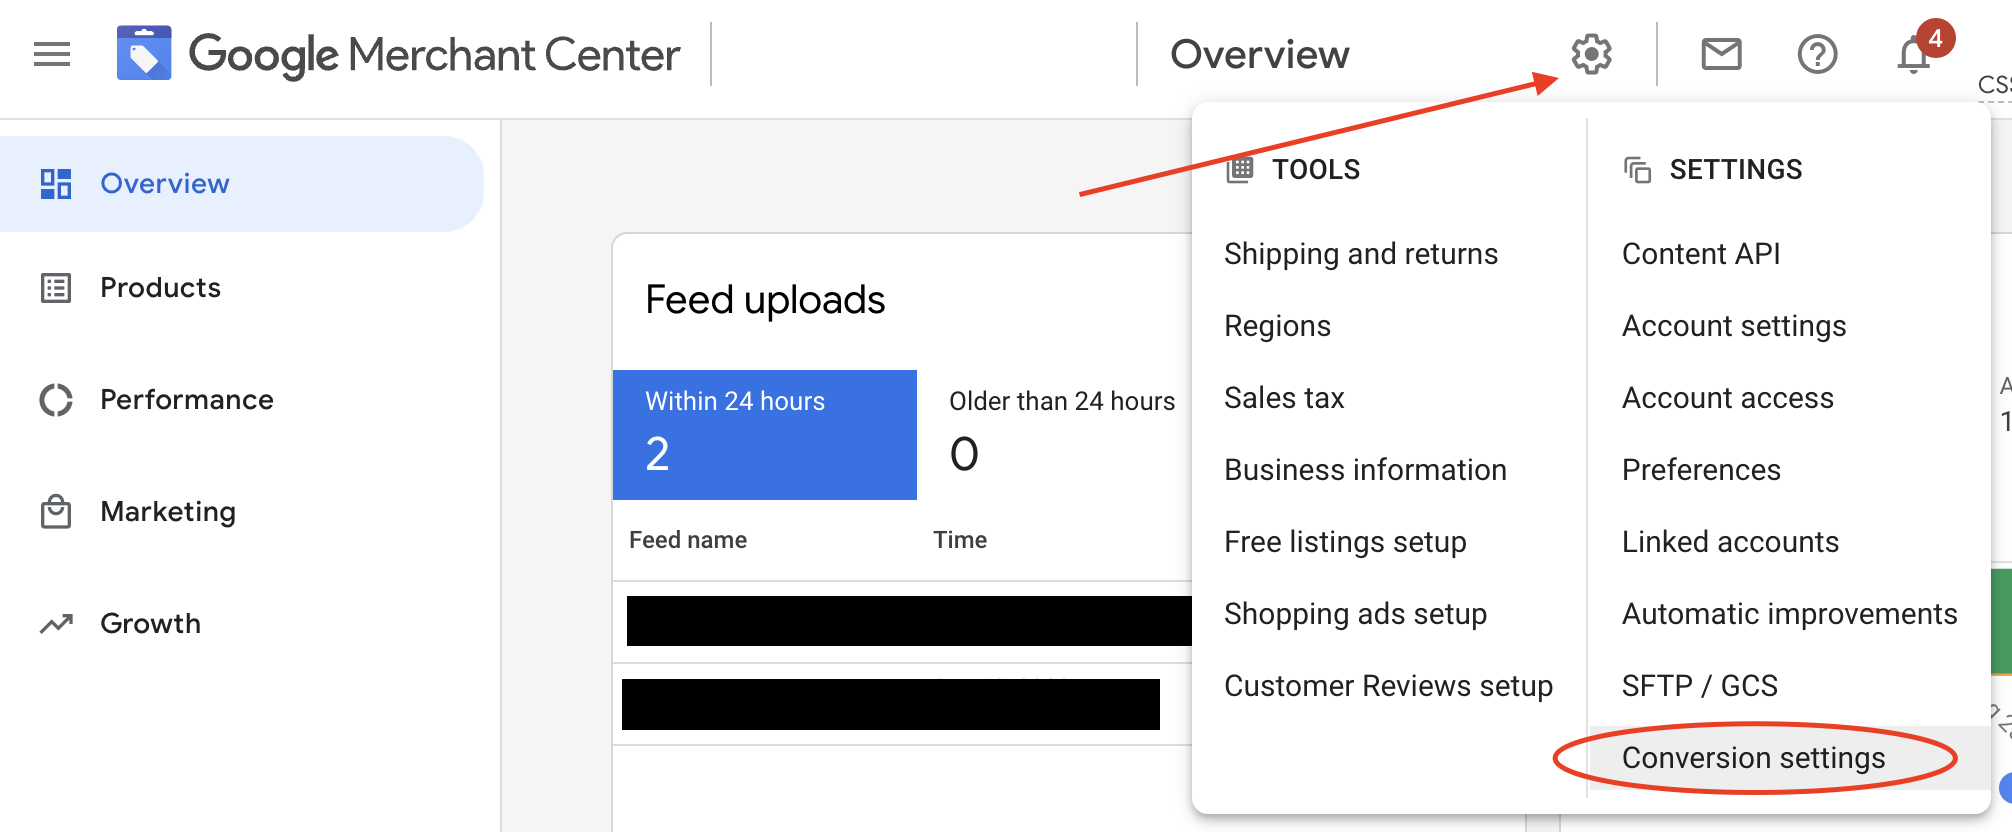
Step 1 - Access Conversion Settings In Merchant Center
Log in to your Google Merchant Center account. Navigate to Settings by clicking the gear icon in the top right corner and click "Conversion Settings".
Step 2 - Turn on Auto-tagging
Once in the conversion settings screen, click the toggle switch to turn on "auto-tagging", as highlighted below in the screenshot.

Step 3 - Access the admin settings in GA4
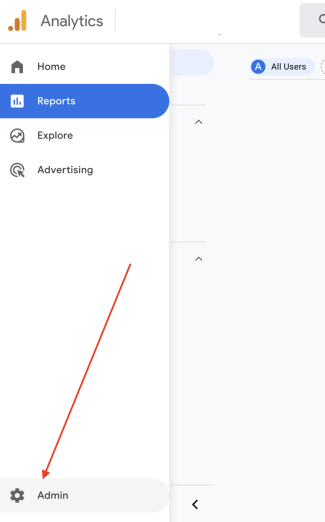
With the above step complete, Head to your Google Analytics 4 account and click the gear icon at the bottom of the left menu to access your "admin" settings.
Step 4 - Link GA4 with Google Merchant Center:
Locate "Merchant Center" in the property column, and after clicking this, you should see the interface showing you which Merchant Center properties you have linked to your Google Analytics property.
If your Merchant Center ID is already listed, you already have it linked. If not, click the "Link" button and choose the Merchant Center property you want to connect. Ensure that auto-tagging is enabled as you go through this process.
Your link should now be created. It will take up to 48 hours to see Merchant Center data in Analytics and Merchant Center.
Next Steps in Your Google Ads Journey
In conclusion, we've covered a wealth of information about Google Merchant Center and its role in maintaining Product Listing Ads, from its essential features to optimisation tips and analytics integration.
Key Takeaways:
- - Google Merchant Center is a powerful tool for showcasing your products to a broad audience through Google Shopping and free product listings.
- - Setting up your account involves creating a product data feed and adhering to Google's policies and guidelines.
- - Navigating Google Merchant Center involves understanding the dashboard, managing product listings, monitoring performance, and using growth features.
- - Troubleshooting errors and avoiding account suspension are crucial to maintaining a successful Merchant Center account.
- - Optimising your product data feed by fine-tuning attributes like titles, images, and descriptions is essential for better visibility and click-through rates.
- - Linking Google Merchant Center with Google Analytics 4 provides valuable insights into the performance of your free product listings.
Final Thoughts: Google Merchant Center is an invaluable platform for e-commerce businesses, offering increased visibility and sales potential. However, success requires careful attention to detail, policy adherence, and ongoing optimisation.
For those looking to dive deeper into Google Ads, consider exploring more advanced topics like ad campaign optimisation, audience targeting, and bid strategies. Alternatively, if you're feeling overwhelmed or simply want to maximise your results, professional PPC management services, such as those offered by Click Pilot, can provide expert guidance and execution.
Remember, online advertising is ever-evolving, so staying informed and adapting your strategies is vital to long-term success in the digital marketplace.
Good luck on your Google Ads journey!
Book A Discovery Call
Looking for tailor-made PPC strategies? Our team is here to help you maximize your online store's potential. Book a discovery call with us for personalised insights and solutions.
Book Your Free ConsultationBook Your Call